Platform Overview
Fair TPRM is a unified platform built around two integrated modules:
- TPRM Module — Third-Party Risk Management for tracking, assessing, and scoring vendor relationships throughout their entire lifecycle.
- GRC Module — Governance, Risk & Compliance for managing your organization’s compliance posture across multiple industry frameworks including SOC 2, ISO 27001, PCI DSS, NIST CSF, CMMC, HIPAA, CIS Controls, NIST 800-171, and the NIST AI Risk Management Framework.
Both modules share the same database, the same permission model, and the same audit log — eliminating data silos and duplicate work.
User Roles & Permissions
Fair TPRM uses role-based access control (RBAC) with seven default ACL groups. Each user is assigned to one or more groups that determine which modules and actions they can access.
| Group | Access Level |
|---|---|
| Administrator | Full access to all modules, settings, and administrative functions across the entire platform. |
| Cyber TPRM | Full access to all TPRM module operations including vendor management, assessments, FAIR analysis, and SRS scoring. |
| Cyber GRC | Full access to all GRC module operations including compliance assessments, controls, evidence, policies, audits, and the risk register. |
| GRC Contributors | Limited access — can complete assigned tasks, provide evidence, and respond to assessment questions delegated to them. |
| Auditor | Read-only access to both TPRM and GRC modules for audit and review purposes. |
| Procurement | Access to vendor onboarding, contract management, and procurement documents within the TPRM module. |
| Stakeholder | Access limited to vendors they own or have been assigned, including the ability to submit vendor requests. |
Your First Login
- Open your browser and navigate to your organization’s Fair TPRM URL (provided by your administrator).
- Enter your Username and Password on the login screen.
- If TOTP two-factor authentication is enabled for your account, enter the six-digit code from your authenticator app.
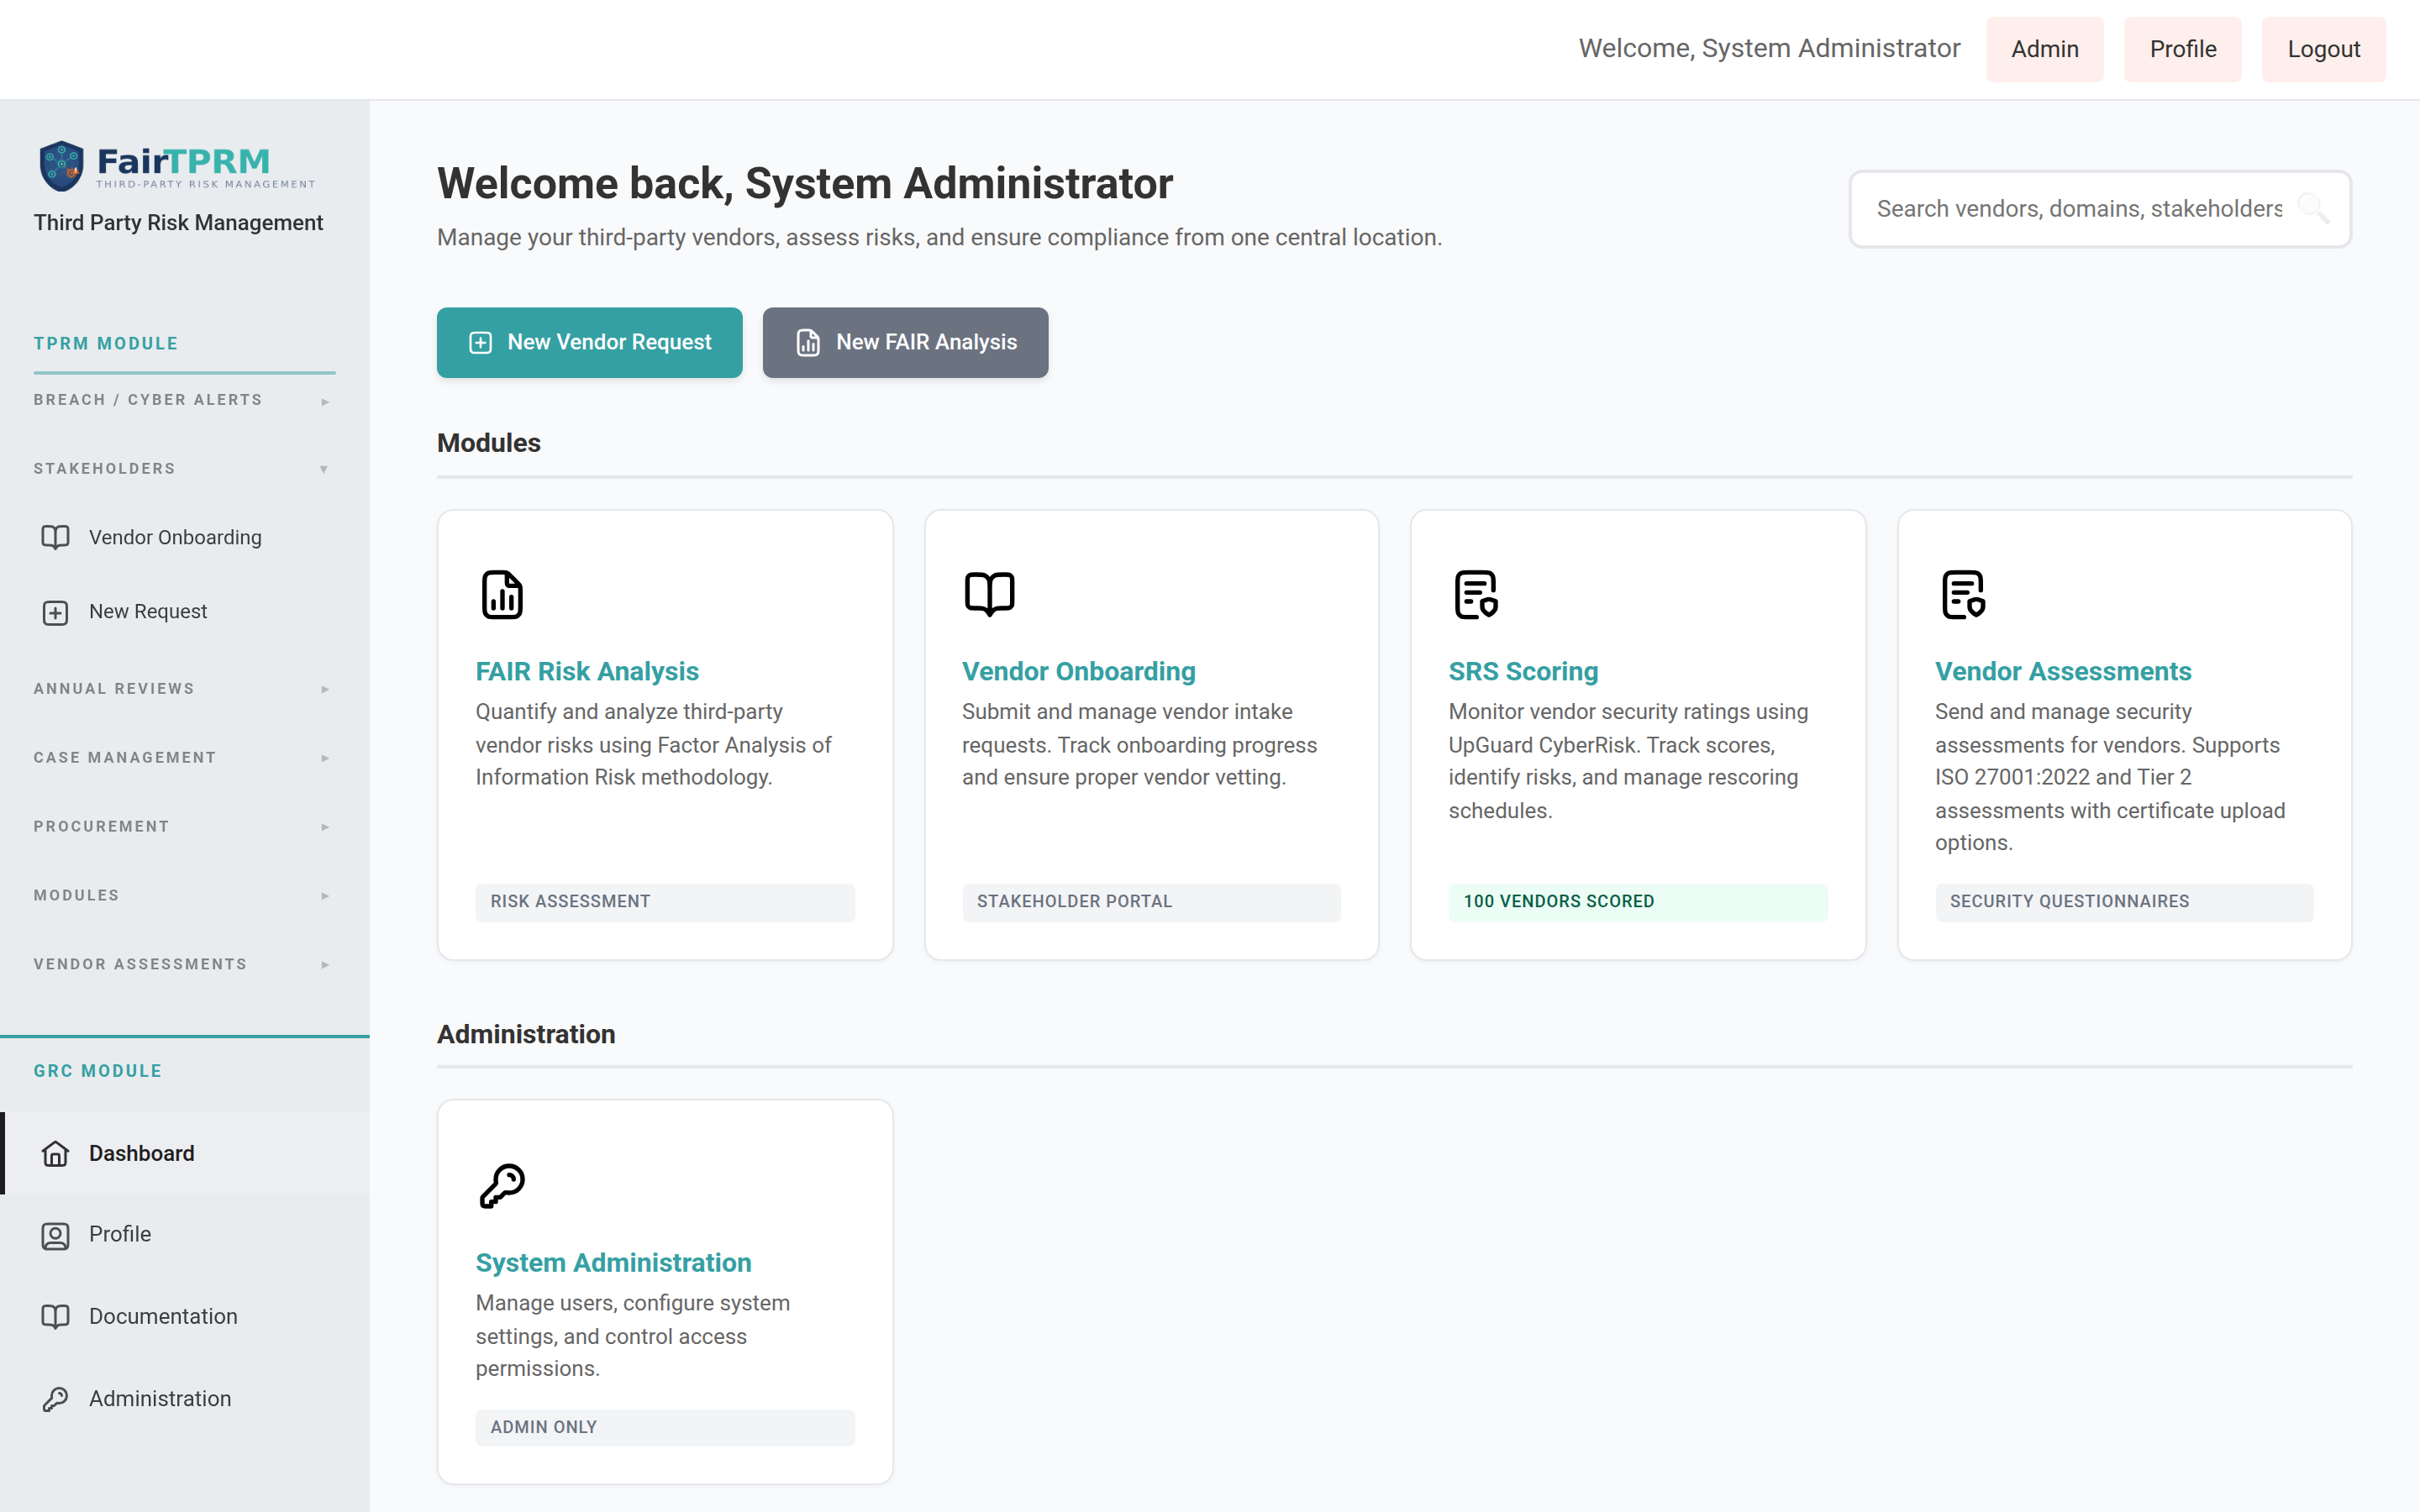
- After successful authentication you will land on the page.
- In the sidebar, click to expand its sections and begin working with compliance features.
What’s New in Version 2.6.1
Version 2.6.1 adds several features focused on vendor onboarding, procurement collaboration, multi-language support, and shadow-SaaS discovery. If you have used an earlier version (2.5.8), here is what is new. Each item links to its full walkthrough later in this guide.
| New Feature | What It Does | Who It’s For |
|---|---|---|
| Language settings | Use the platform in 8 languages. Each person picks their own language; admins choose which languages are available. | Everyone |
| Procurement Onboarding & Vendor ID | A vendor must be onboarded through procurement and have a valid Vendor ID (VID) before it can be submitted for cyber review. | Procurement, Stakeholders |
| AI Review for vendors | A dedicated review status for vendors whose services use AI, plus a “Force AI Review” action. | Cyber TPRM, Admins |
| Procurement Cyber Status | A live page showing vendors in review, with a running history of updates the cyber team shares with procurement, plus a weekly email digest. | Procurement, Cyber TPRM |
| Grip Security integration | Automatically discover SaaS apps used across your organization and pull them into the Shadow SaaS list. | Admins |
| Zscaler blocking | Block an unsanctioned app’s web domain directly in Zscaler with one click. | Admins |
| In-app upgrades | Check your registry for a newer version and upgrade from inside the Admin Portal. | Admins |
Changing Your Language New in 2.6.1
The platform interface can be displayed in 8 languages. Every person chooses their own language — changing it only affects your screen, not anyone else’s. Your choice is remembered every time you log in.
Languages available
| Language | Shown in the menu as |
|---|---|
| English | English |
| Spanish | Español |
| Italian | Italiano |
| Ukrainian | Українська |
| Chinese (Simplified) | 中文(简体) |
| Hindi | हिन्दी |
| French | Français |
| Portuguese | Português |
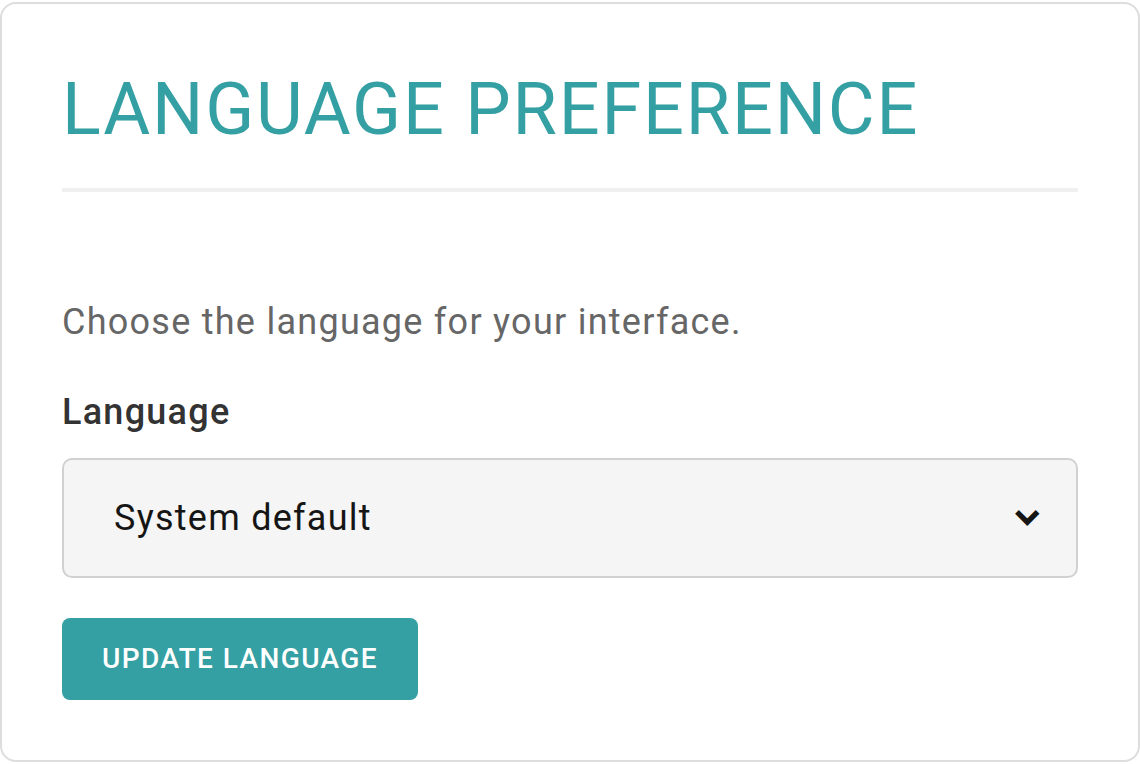
How to change your language
- Click in the top-right corner of any page.
- On the Profile page, scroll down to the Language Preference card.
- Click the Language drop-down and choose your language. To go back to the language your administrator set for everyone, choose System default.
- Click Update Language. The page reloads and the menus, buttons, and labels now appear in your chosen language.
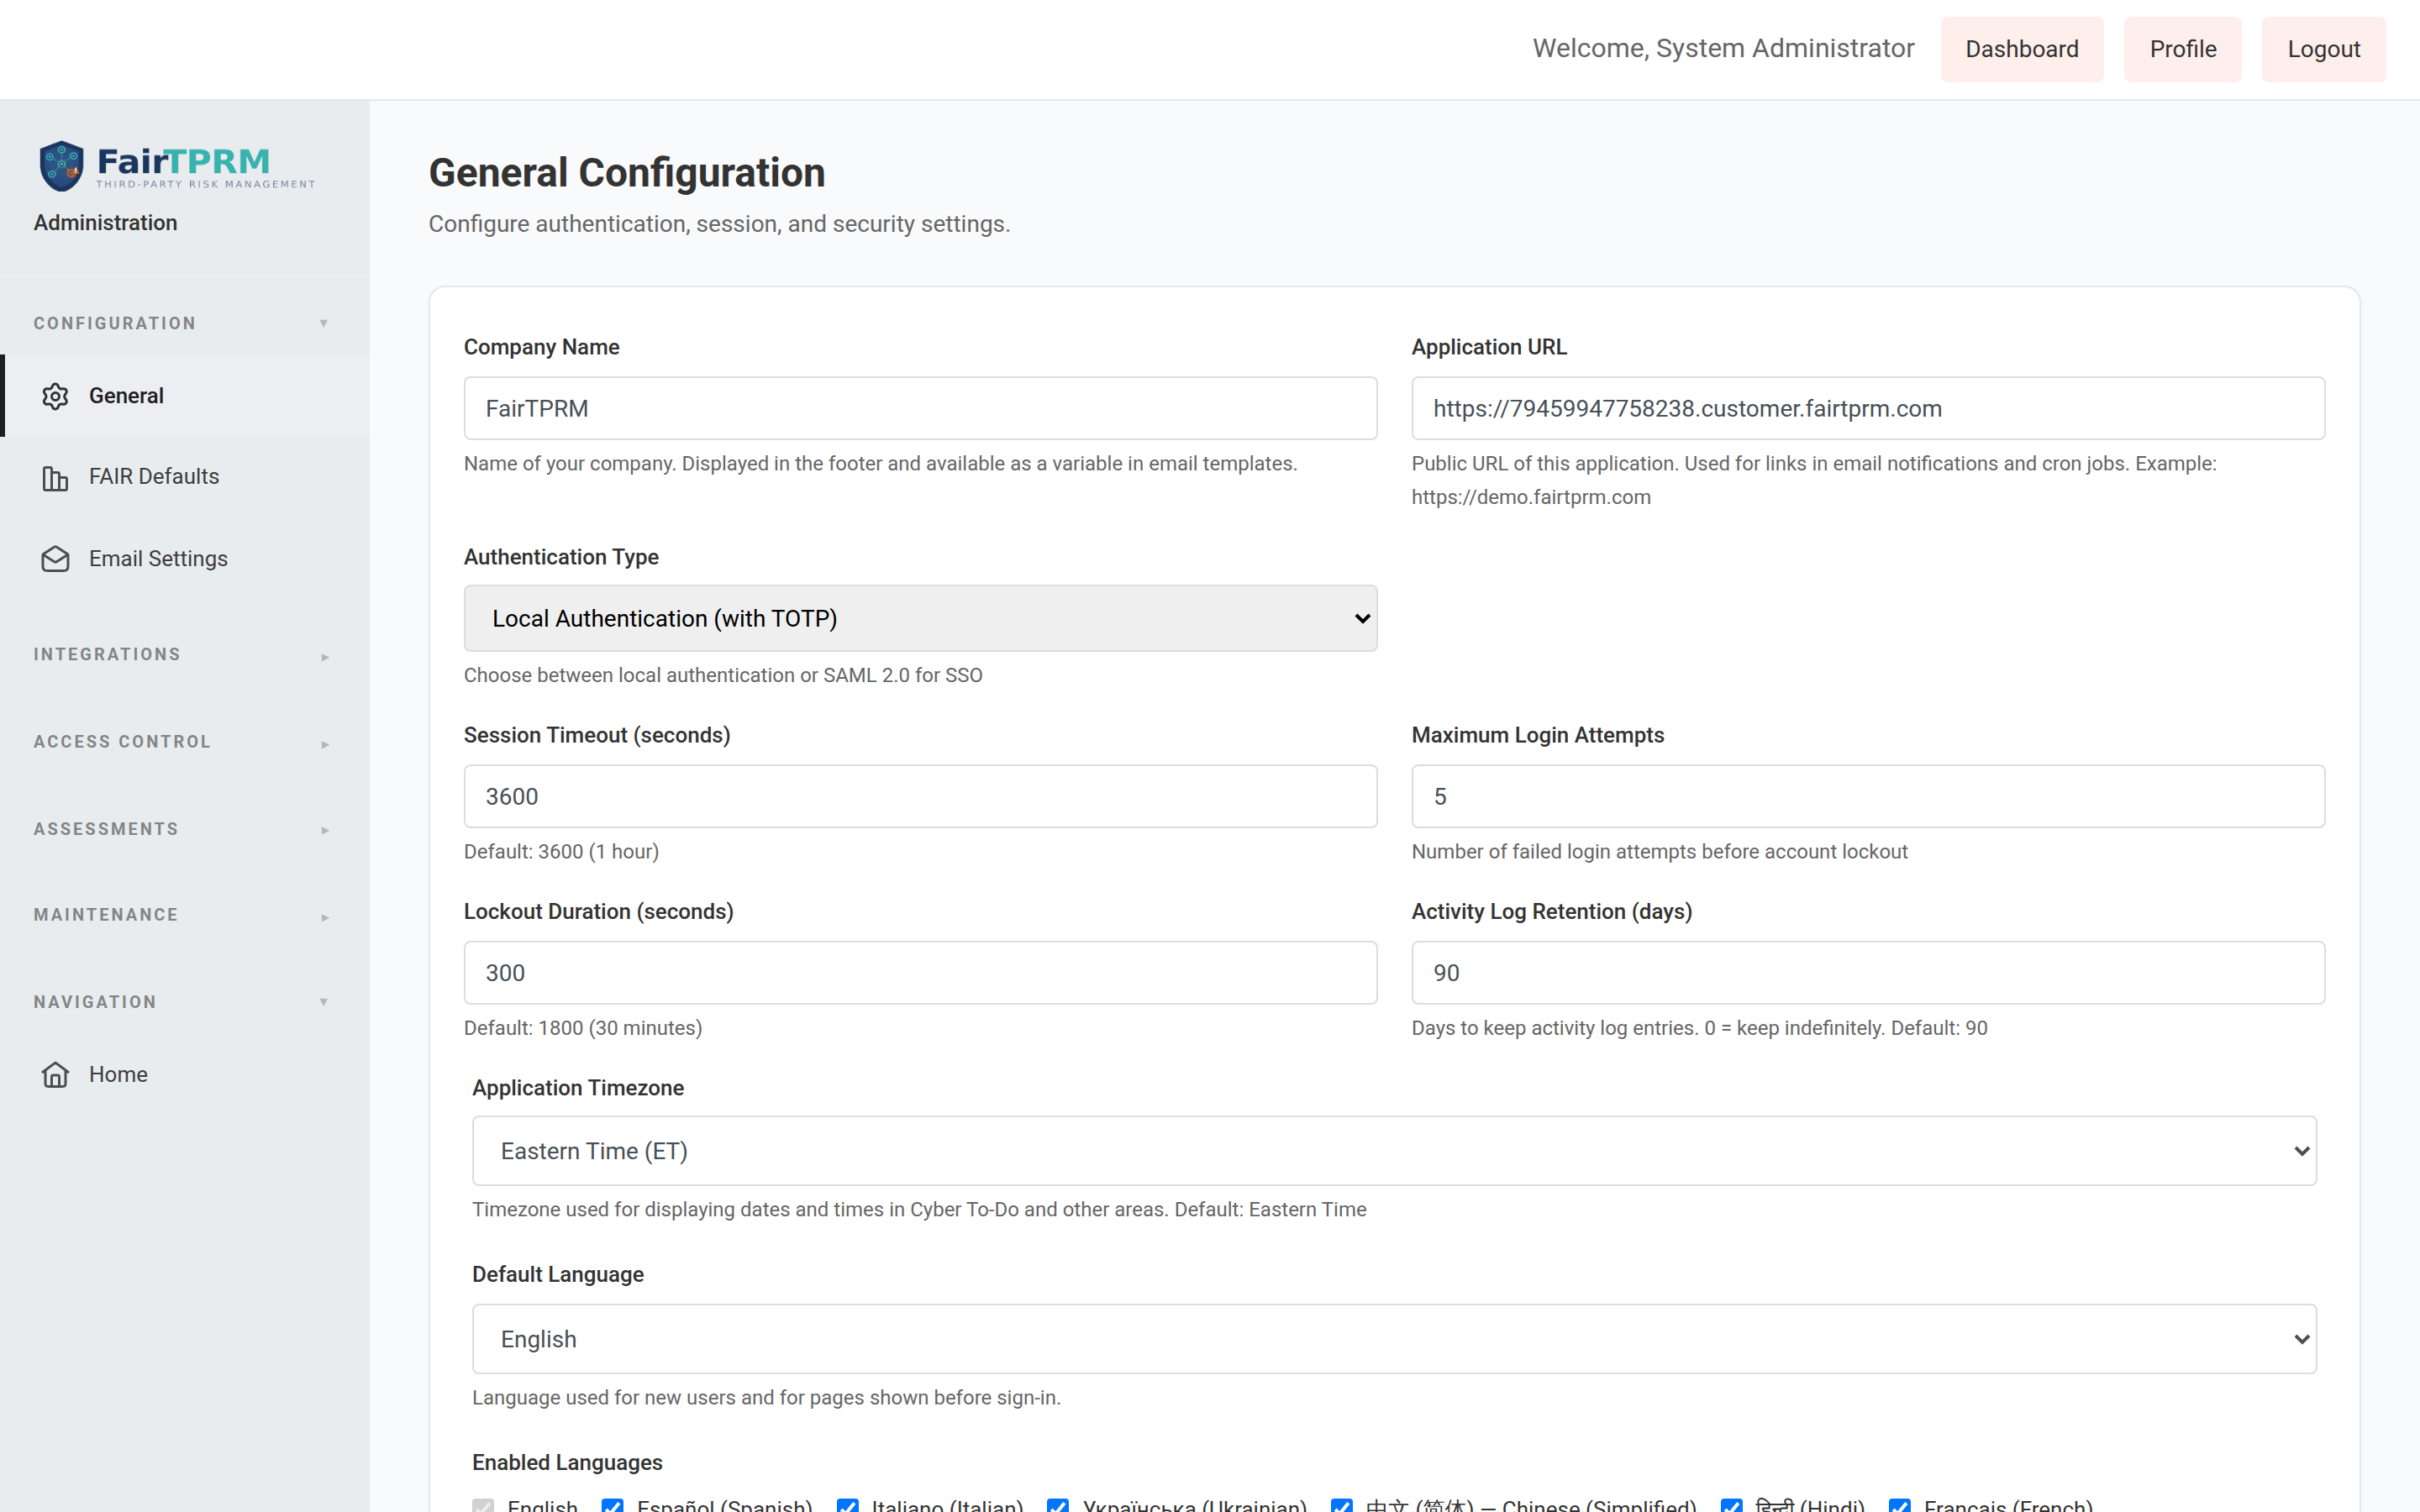
For administrators: choosing which languages are available
Administrators control the organization-wide default language and the list of languages users may choose from. Go to → and use the Default Language and Enabled Languages settings. English is always enabled.
GRC Module Overview
GRC stands for Governance, Risk & Compliance. The GRC module helps your organization:
- Assess security maturity across 14 domains using the unified questionnaire
- Track compliance posture against 9 industry frameworks simultaneously
- Manage internal controls and map them to framework requirements
- Collect and encrypt compliance evidence with expiry tracking
- Manage policies through their full lifecycle from draft to retirement
- Plan and execute audits with finding tracking and remediation
- Maintain a risk register with likelihood and impact scoring
- Run continuous monitors to demonstrate ongoing compliance
Getting Started with GRC — Quick Start
Follow this five-step workflow to complete your first GRC compliance assessment:
- Create an Assessment — Define the scope and select the assessment type.
- Answer Questions — Work through the 170+ unified questions across 14 security domains.
- Upload Evidence — Attach supporting documents and artifacts to your responses.
- View Compliance Scores — Review automatically calculated compliance percentages for each framework.
- Generate Reports — Export framework-specific compliance reports for stakeholders and auditors.
Step 1: Create Your First Assessment
- In the sidebar, expand → → click .
- Click the Create Assessment button.
- Fill in the required fields:
- Title — A descriptive name for the assessment (e.g., “Q1 2026 Annual Compliance Assessment”).
- Assessment Type — Choose from five options: Initial Assessment, Annual Review, Gap Analysis, Remediation Validation, or Ad-Hoc Assessment.
- Scope — Describe what the assessment covers (e.g., “Enterprise-wide security posture”).
- Lead Auditor — Select the user who will lead the assessment.
- Start Date and End Date — Define the assessment period.
Title: Q1 2026 Annual Compliance Assessment
Type: Annual Review
Scope: Enterprise-wide security posture across all business units
Lead Auditor: Jane Smith
Start Date: 2026-01-15
End Date: 2026-03-31
Assessment Statuses
| Status | Description |
|---|---|
| Draft | Assessment has been created but questions have not been started. |
| In Progress | Questions are actively being answered by the assessment team. |
| Under Review | All questions answered; the lead auditor is reviewing responses. |
| Completed | Assessment has been reviewed and finalized. Scores are locked. |
| Archived | Assessment retained for historical reference. Read-only. |
Step 2: Answer Assessment Questions
The unified assessment contains 170+ questions organized across the following 14 security domains:
| Code | Domain | Questions |
|---|---|---|
| GOV | Governance & Leadership | 12 |
| IAM | Identity & Access Management | 14 |
| DSP | Data Security & Privacy | 12 |
| EPS | Endpoint Security | 8 |
| NET | Network Security | 12 |
| APS | Application Security | 9 |
| OPS | Security Operations | 12 |
| INC | Incident Management | 8 |
| SCM | Supply Chain Management | 7 |
| PHY | Physical Security | 6 |
| HRS | Human Resources Security | 8 |
| BCP | Business Continuity & DR | 11 |
| CRY | Cryptography | 9 |
| CMP | Compliance & Audit | 8 |

Answering a Question
- Open the assessment and select a domain to begin answering questions.
- For each question, select a Maturity Rating from the four-tier scale:
- 1 — Initial / Ad Hoc: Processes are reactive, undocumented, and inconsistently applied.
- 2 — Developing: Processes are partially documented but not consistently followed.
- 3 — Defined: Processes are fully documented and consistently implemented across the organization.
- 4 — Managed / Optimized: Processes are measured, continuously improved, and aligned with industry best practices.
Conformity Status
Based on the maturity rating you select, the system determines a Conformity Status for each mapped framework requirement:
- Conforming — The requirement is fully met (typically maturity 3 or 4).
- Partial — The requirement is partially met (typically maturity 2).
- Non-Conforming — The requirement is not met (typically maturity 1).
- Not Applicable — The requirement does not apply to your organization’s scope.
Step 3: Upload Evidence
Evidence files support your assessment responses and demonstrate compliance to auditors.
- While answering a question, click the Attach Evidence button next to the question.
- Select a file from your computer (supported formats include PDF, images, and documents).
- Add a Description and set the Expiry Date for the evidence.
- Click Upload to attach the evidence to the question.
Evidence Library
All uploaded evidence is also accessible from the (sidebar → GRC Module → Evidence & Monitoring → Evidence Library). The library provides a centralized view of all evidence across the platform, with filtering by status, expiry date, and linked control or question.
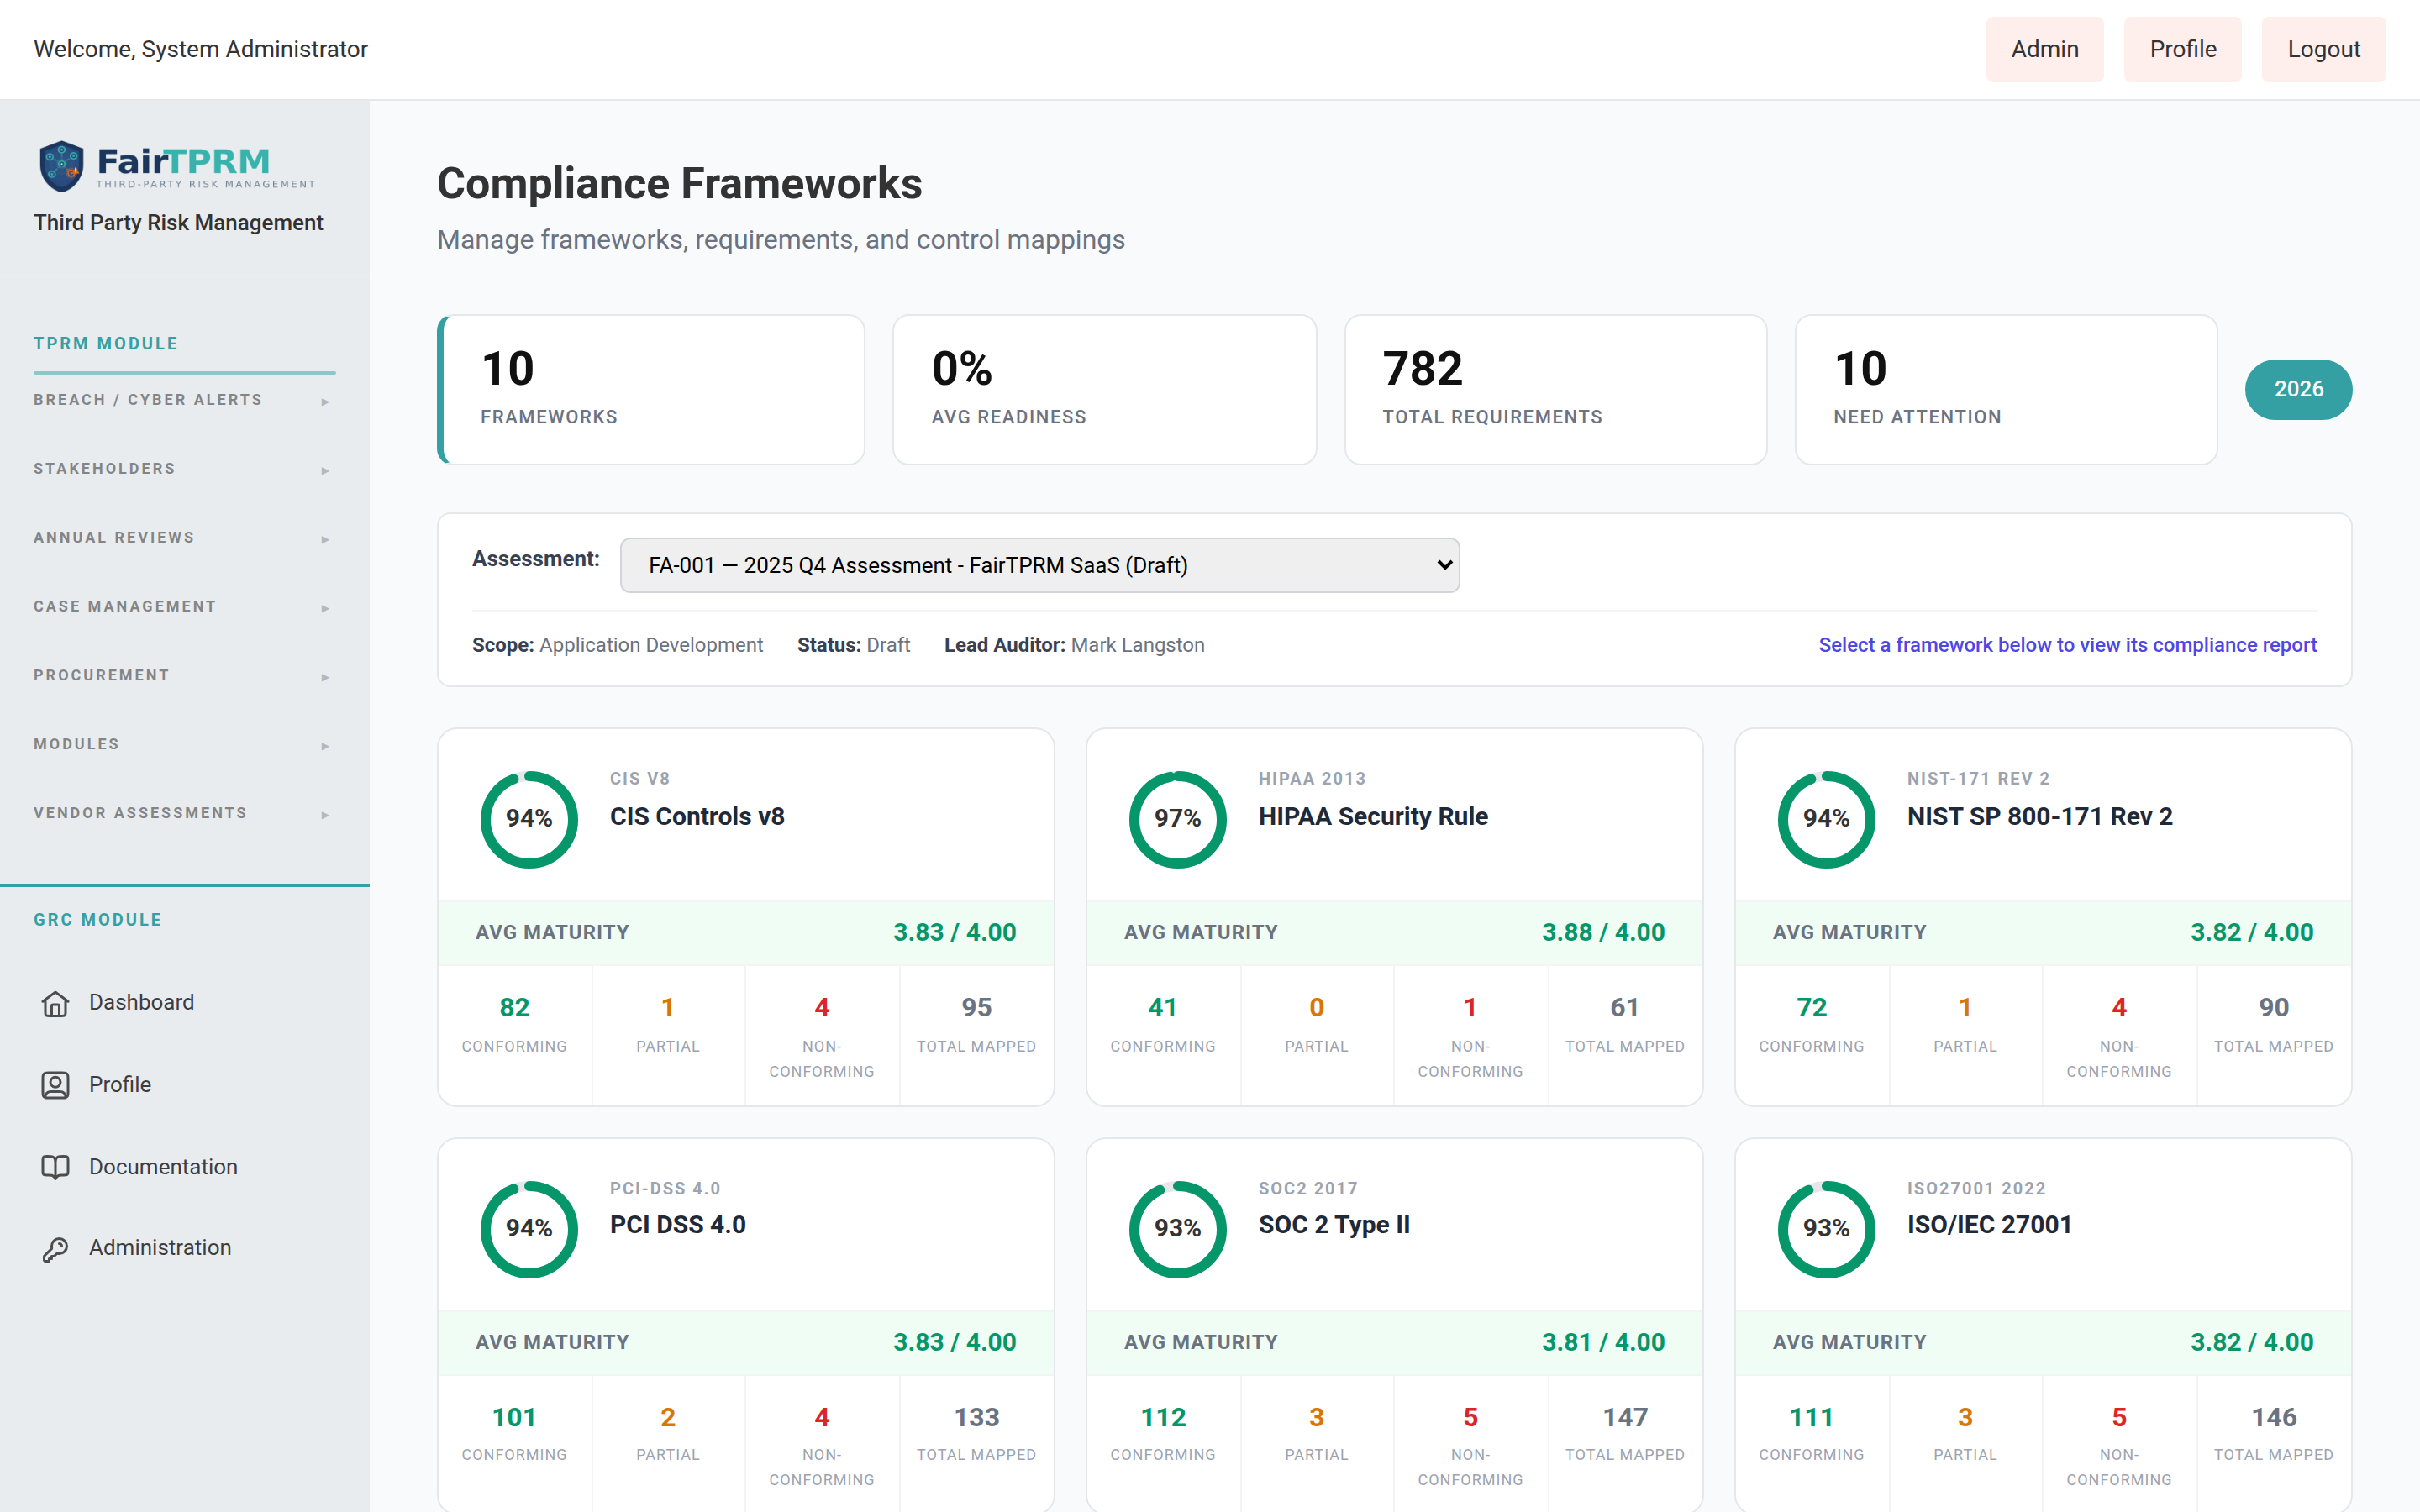
Step 4: View Compliance Scores
- Navigate to → → .
- The dashboard displays a card for each supported framework showing a donut chart with the current compliance percentage.
- Click any framework card to drill into its detailed compliance report.
Compliance Formula
Requirements marked as “Not Applicable” are excluded from the denominator, ensuring your score reflects only relevant requirements.
Supported Frameworks
| Framework | Version | Mapped Questions |
|---|---|---|
| NIST Cybersecurity Framework (CSF) | 2.0 | 170+ |
| ISO/IEC 27001 | 2022 | 170+ |
| SOC 2 Type II | 2017 | 170+ |
| PCI DSS | 4.0 | 132 |
| CMMC / NIST 800-171 | v2.0 | 97 |
| CIS Controls | v8 | 95 |
| NIST SP 800-171 | Rev 2 | 90 |
| HIPAA Security Rule | 2013 | 61 |
| NIST AI Risk Management Framework (AI RMF) | 1.0 | 48 |
Step 5: Generate a Framework Compliance Report
- From the Compliance Dashboard, click the framework card you want to report on.
- Click the Generate Report button at the top of the framework detail page.
- The report is generated and displayed in-browser. Use the Export PDF button to download a copy.
What Each Requirement Card Shows
The compliance report lists every requirement for the selected framework. Each requirement card displays:
- Reference — The framework requirement identifier (e.g., CC6.1 for SOC 2, A.8.2 for ISO 27001).
- Title — The requirement name or description.
- Status Badge — Conforming, Partial, Non-Conforming, or Not Applicable.
- Mapped Questions — Each linked unified question showing its maturity rating, conformity status, validation notes, and attached evidence.
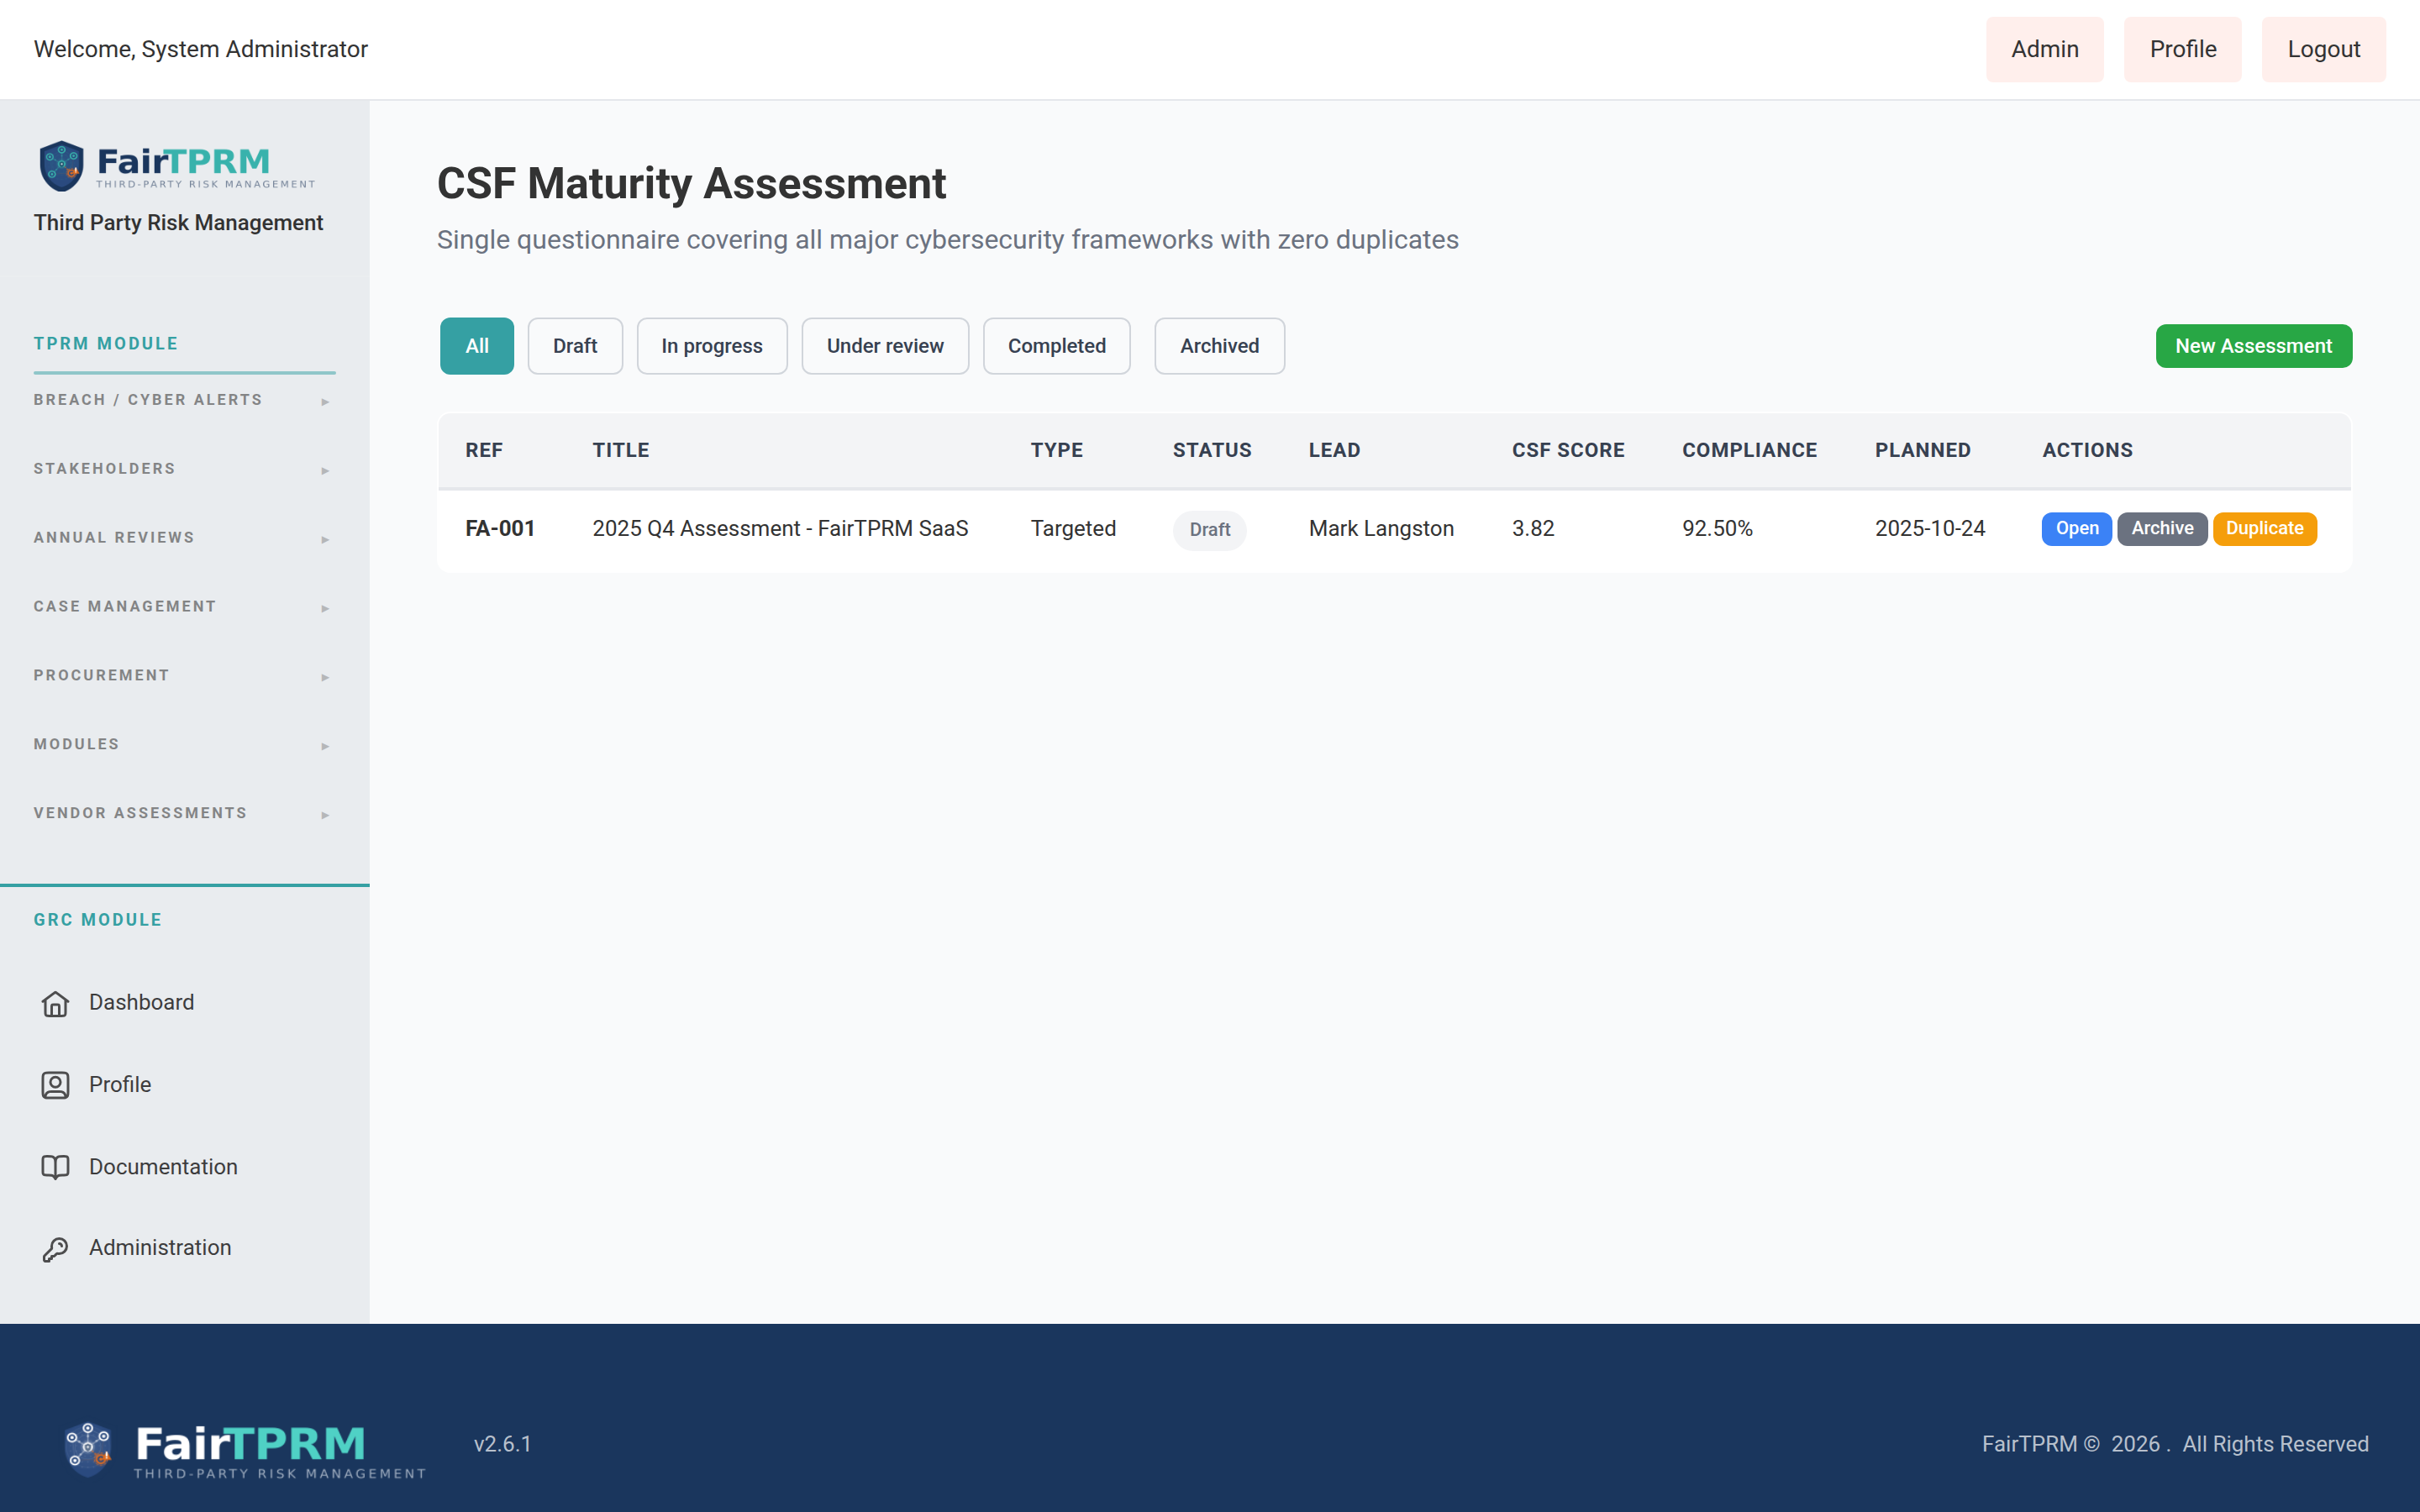
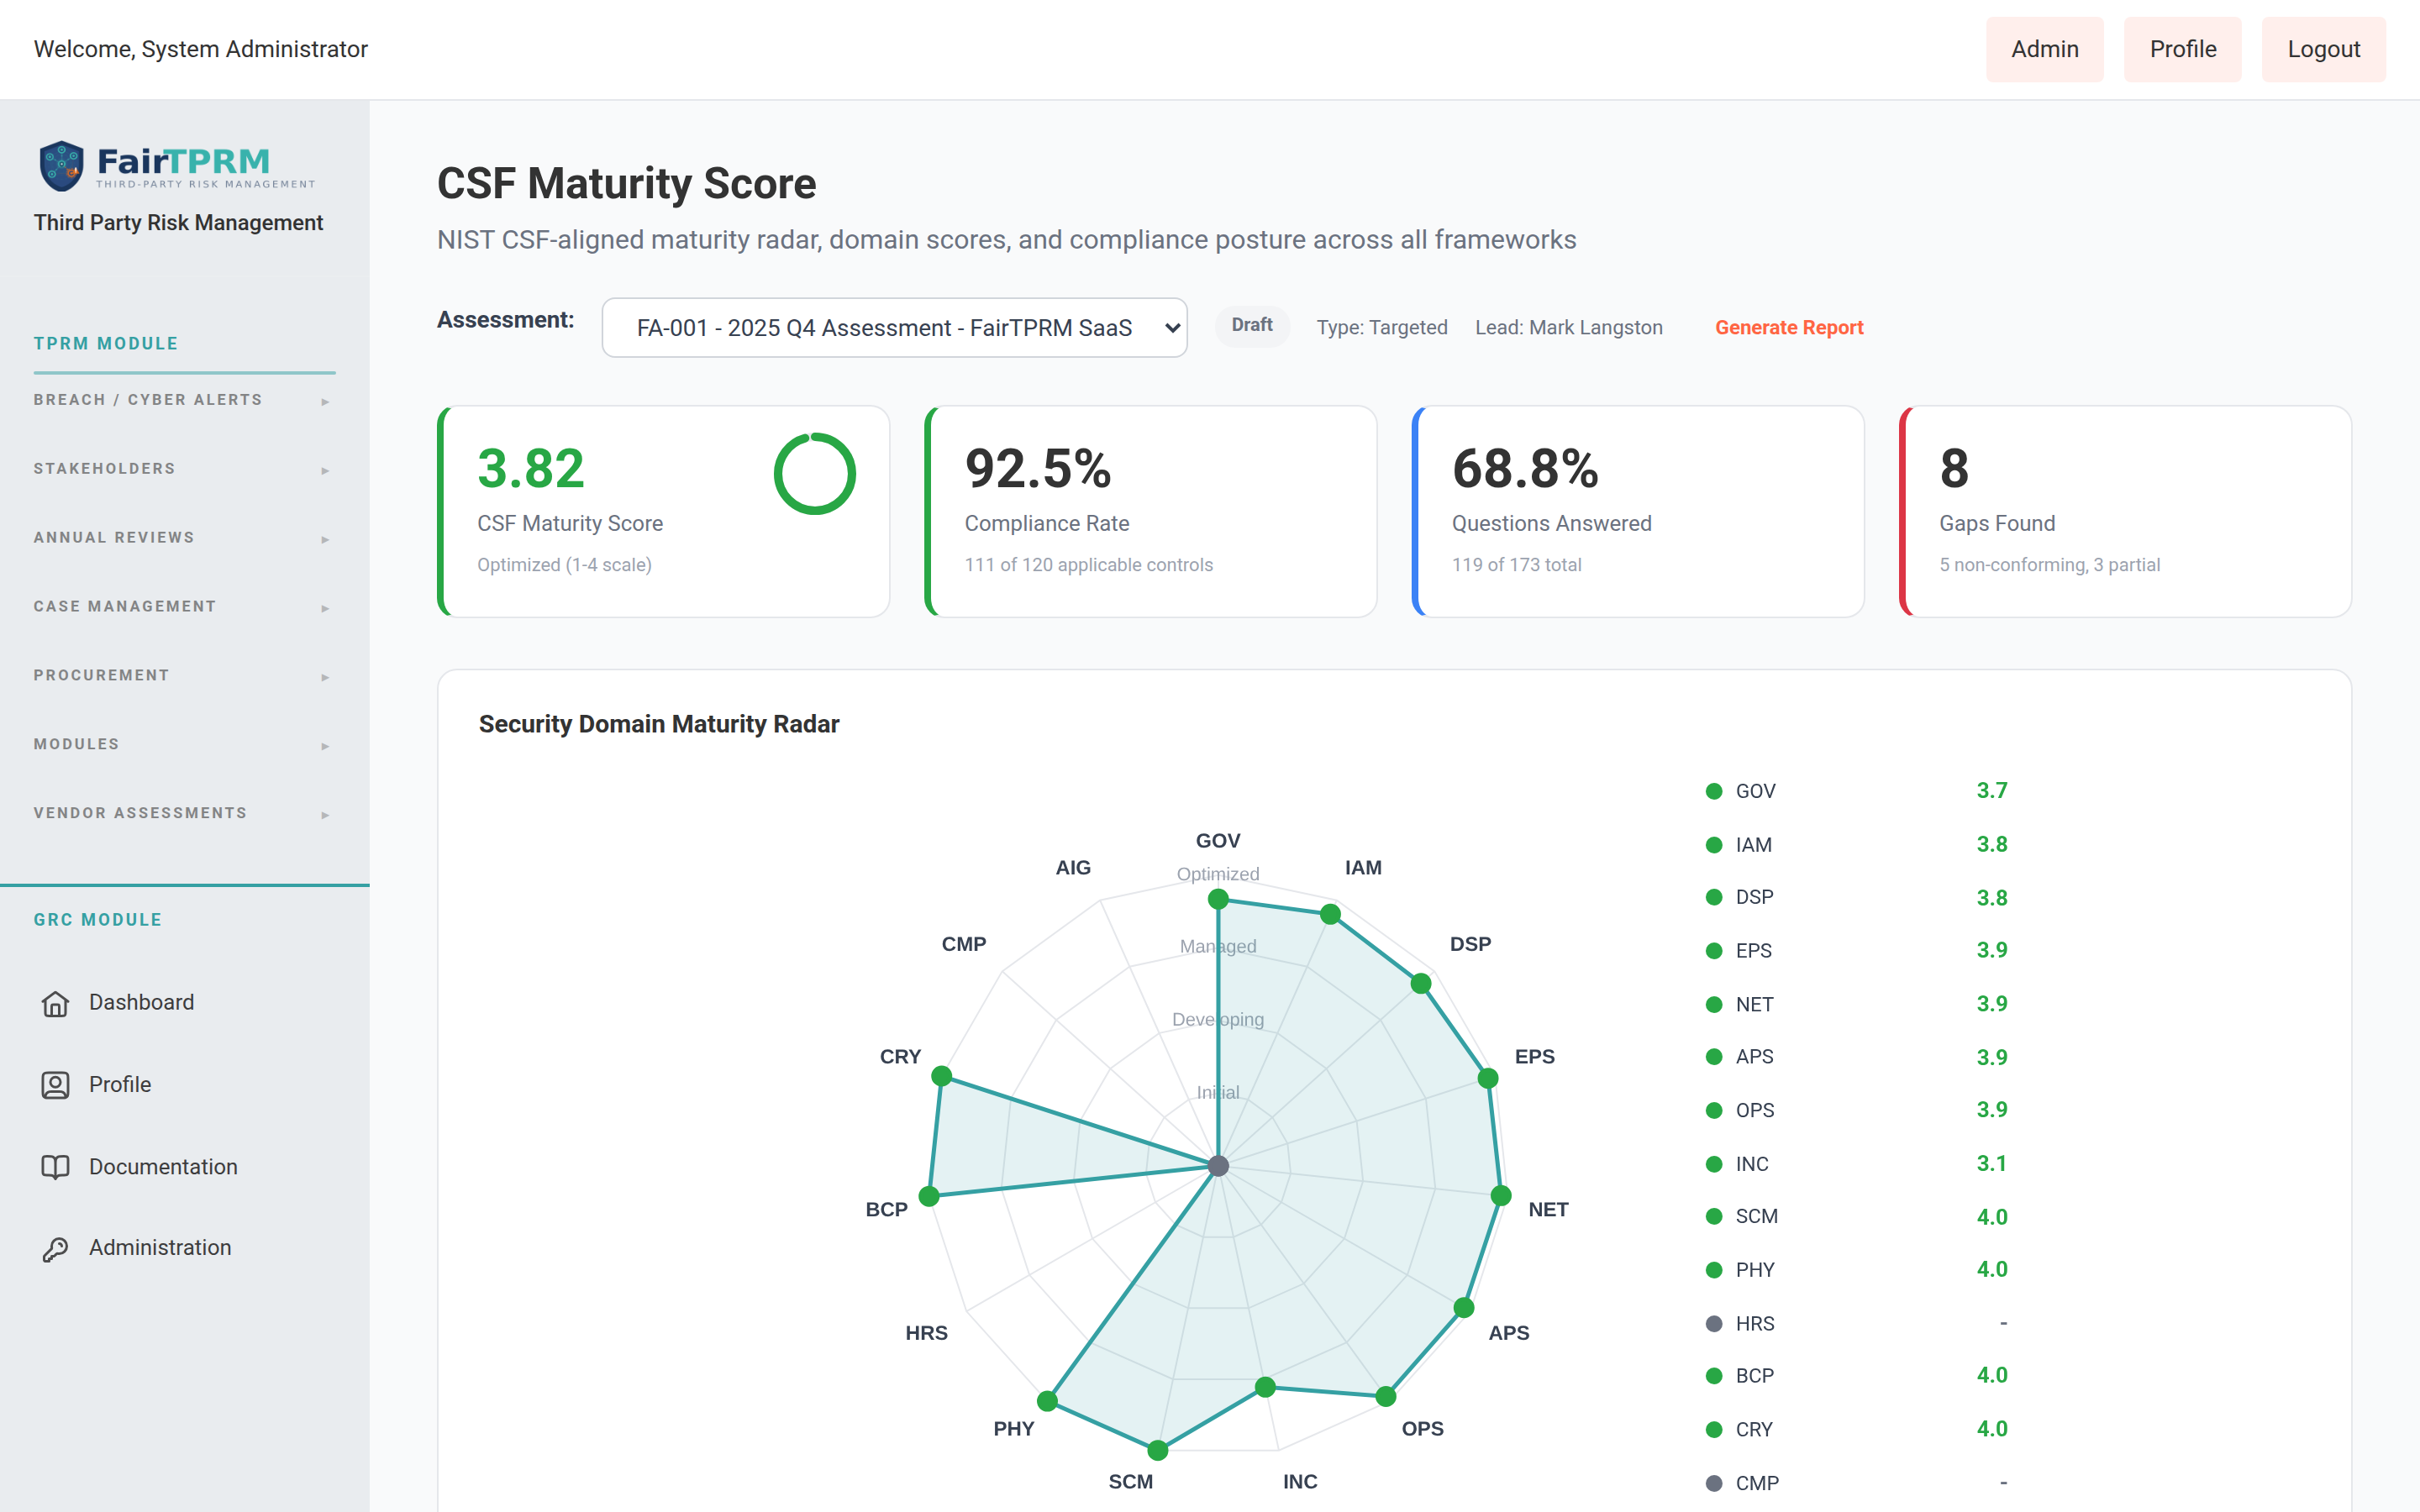
CSF Maturity Score Dashboard
- In the sidebar, navigate to → → .
- Select an assessment from the dropdown to view its maturity scoring.
The CSF Maturity Score dashboard displays:
- Overall FAIR Score — A single weighted score (1.0–4.0) representing your organization’s overall security maturity.
- Radar Chart — A visual comparison of maturity scores across all 14 security domains.
- Domain Score Cards — Individual maturity scores for each of the 14 domains with color-coded tier indicators.
- Framework Compliance Bars — Horizontal bar charts showing compliance percentages for each supported framework.
- Gap Analysis Summary — A breakdown of domains where maturity falls below your target threshold, with recommendations for improvement.
Frameworks Page
- Navigate to → → .
- Select a framework from the list to view its requirement tree.
The Frameworks page displays the full requirement hierarchy for each supported framework. Requirements are organized in a tree view with expandable sections, domains, and individual requirements. Each requirement shows its conformity status and linked assessment questions.
Internal Controls
Internal controls document the security measures your organization has in place. Controls can be mapped to requirements across multiple frameworks simultaneously.
- Navigate to → → .
- Click Add Control to create a new control.
- Fill in the control details:
- Title — A descriptive name for the control.
- Description — What the control does and how it is implemented.
- Type — Preventive, Detective, or Corrective.
- Category — Technical, Administrative, or Physical.
- Status — Not Implemented, Partially Implemented, or Fully Implemented.
- Effectiveness — Effective, Partially Effective, or Ineffective.
- Risk Level — Low, Medium, High, or Critical.
- Owner — The user responsible for maintaining this control.
- Test Frequency — How often the control is tested (e.g., Monthly, Quarterly, Annually).
- Framework Mapping — Select which framework requirements this control satisfies.
Framework Crosswalk
The crosswalk tool lets you compare coverage between any two supported frameworks to identify gaps and overlaps.
- Navigate to → → .
- Select a Source Framework from the first dropdown (e.g., SOC 2).
- Select a Target Framework from the second dropdown (e.g., ISO 27001).
- The crosswalk displays a side-by-side mapping showing which source requirements map to target requirements, and highlights any gaps where the target framework has requirements not covered by the source.
Evidence Library
The Evidence Library provides a centralized view of all compliance evidence uploaded across the platform.
- Navigate to → → .
- Click Upload Evidence to add a new evidence file.
- Fill in the Title, Description, Expiry Date, and optionally link the evidence to a control or assessment question.
- Select the file and click Upload.
Evidence Statuses
| Status | Description |
|---|---|
| Current | Evidence is valid and within its expiry date. |
| Expired | Evidence has passed its expiry date and needs to be renewed. |
| Superseded | Evidence has been replaced by a newer version. |
| Draft | Evidence has been uploaded but not yet approved or finalized. |
Policy Management
The Policy Management feature lets you create, review, approve, and publish organizational policies with version tracking and periodic review scheduling.
- Navigate to → → .
- Click Create Policy to add a new policy.
- Fill in the policy details:
- Title — The policy name (e.g., “Acceptable Use Policy”).
- Category — The policy category (e.g., Information Security, Access Control, Data Privacy).
- Review Frequency — How often the policy should be reviewed (e.g., Annually, Semi-Annually).
- Content — The full policy text, entered in the rich text editor.
Policy Lifecycle
Draft → Review → Approved → Published → Retired
Audits & Findings
The Audits feature supports your internal and external audit processes from planning through remediation and closure.
- Navigate to → → .
- Click Create Audit to start a new audit.
- Define the audit scope, assign the audit lead, and set the timeline.
- During fieldwork, record findings using the Add Finding button. Each finding includes a title, description, severity rating, affected control, and recommended remediation.
- Assign remediation tasks to responsible parties and track progress through to closure.
Audit Statuses
| Status | Description |
|---|---|
| Planning | Audit scope and resources are being defined. |
| Fieldwork | Audit testing and evidence collection are underway. |
| Reporting | Findings are being documented and the audit report is being drafted. |
| Remediation | Findings have been reported and remediation tasks are in progress. |
| Closed | All findings have been resolved and the audit is finalized. |
Risk Register
The Risk Register tracks organizational risks with quantified likelihood and impact scoring.
- Navigate to → → .
- Click Add Risk to create a new risk entry.
- Fill in the risk details:
- Title — A concise name for the risk.
- Description — A detailed description of the risk scenario.
- Category — The risk category (e.g., Operational, Technical, Compliance, Strategic).
- Likelihood — Probability of occurrence on a 1–5 scale.
- Impact — Severity of consequences on a 1–5 scale.
- Treatment Strategy — Accept, Mitigate, Transfer, or Avoid.
The Inherent Risk Score is calculated as Likelihood × Impact (range 1–25) before controls are applied. The Residual Risk Score is recalculated after treatment controls are linked, reflecting the remaining risk after mitigation measures are in place.
Continuous Monitors
Continuous monitors run automated compliance checks on a scheduled basis to demonstrate ongoing compliance to auditors.
- Navigate to → → .
- Click Create Monitor to define a new monitor.
- Fill in the monitor details:
- Title — A descriptive name for the monitor.
- Check Type — The type of check to perform (e.g., Certificate Expiry, DNS Configuration, Policy Review Due).
- Frequency — How often the monitor runs (Hourly, Daily, Weekly, or Monthly).
- Collector Configuration — The technical configuration for the data collection method, including target endpoints and thresholds.
Task Inbox
The Task Inbox shows all GRC tasks assigned to the currently logged-in user. Tasks are generated when assessment questions or remediation items are delegated to you.
- Navigate to → → .
- Review your assigned tasks, which include the task type, due date, and priority.
- Click a task to open it, complete the required action (answer a question, upload evidence, or confirm remediation), and mark it as done.
GRC Dashboard
The GRC Dashboard provides a single-pane-of-glass view across your entire compliance program. It displays:
- Framework Compliance Heatmap — Color-coded compliance scores for all 9 frameworks at a glance.
- Control Implementation Progress — Percentage of controls that are fully implemented, partially implemented, and not implemented.
- Evidence Freshness — Visual indicator of how many evidence items are current, approaching expiry, or expired.
- Open Findings — Count of unresolved audit findings grouped by severity (Critical, High, Medium, Low).
- Policy Review Status — Policies due for review, overdue, and recently reviewed.
- Monitor Health — Pass/fail status of all continuous monitors with trend indicators.
- Risk Register Summary — Distribution of risks by treatment strategy and current risk levels.
TPRM Module Overview
The TPRM (Third-Party Risk Management) module provides end-to-end vendor risk management. It allows you to track and assess vendors, assign risk tiers, send security assessments, perform FAIR risk quantification, monitor 4th party dependencies, and discover Shadow SaaS applications across your organization.
For detailed information about TPRM capabilities, visit the Vendor Lifecycle and FAIR Analysis pages.
Adding a New Vendor
To add a vendor, navigate to the TPRM Module in the sidebar and click Add Vendor. Complete the required fields including Vendor Name, Domain, Type, Tier, contact information, and data handling details such as PII Count and SPII Count (the number of personally identifiable and sensitive personally identifiable information records the vendor will access).
Vendor Lifecycle
Every vendor follows a defined lifecycle from initial request through offboarding. The status flow is:
Draft → Pending Review → In Review → Approved / Rejected → Active → Annual Review → Offboarded
Each transition is logged in the audit trail, and automated notifications can be configured for status changes. See the Vendor Lifecycle page for full details.
Vendor Assessments
Security assessments can be sent directly to vendors through the platform. The vendor receives an email with a secure link to complete the questionnaire. Responses are automatically scored and integrated into the vendor’s risk profile. Assessments can be customized by tier, and follow-up assessments can be triggered based on scoring results.
Security Risk Scorecard (SRS)
The SRS provides an external security score for each vendor based on automated scanning of their public-facing infrastructure. Scoring categories include DNS configuration, SSL/TLS certificate health, email security (SPF, DKIM, DMARC), and open port exposure. Signal weights are fully configurable by administrators. See the Monitoring page for details.
FAIR Analysis
Fair TPRM implements the FAIR (Factor Analysis of Information Risk) quantitative risk model to estimate the financial impact of vendor-related security incidents. The analysis produces an Annualized Loss Expectancy (ALE) and recommended cyber insurance coverage. All multipliers and thresholds are configurable. Visit the FAIR Analysis page for a complete overview.
4th Party Risk
Fourth-party risk tracking lets you identify and monitor your vendors’ vendors — the downstream dependencies that could affect your organization. The platform maps these sub-service relationships and flags concentration risk when multiple vendors rely on the same fourth party.
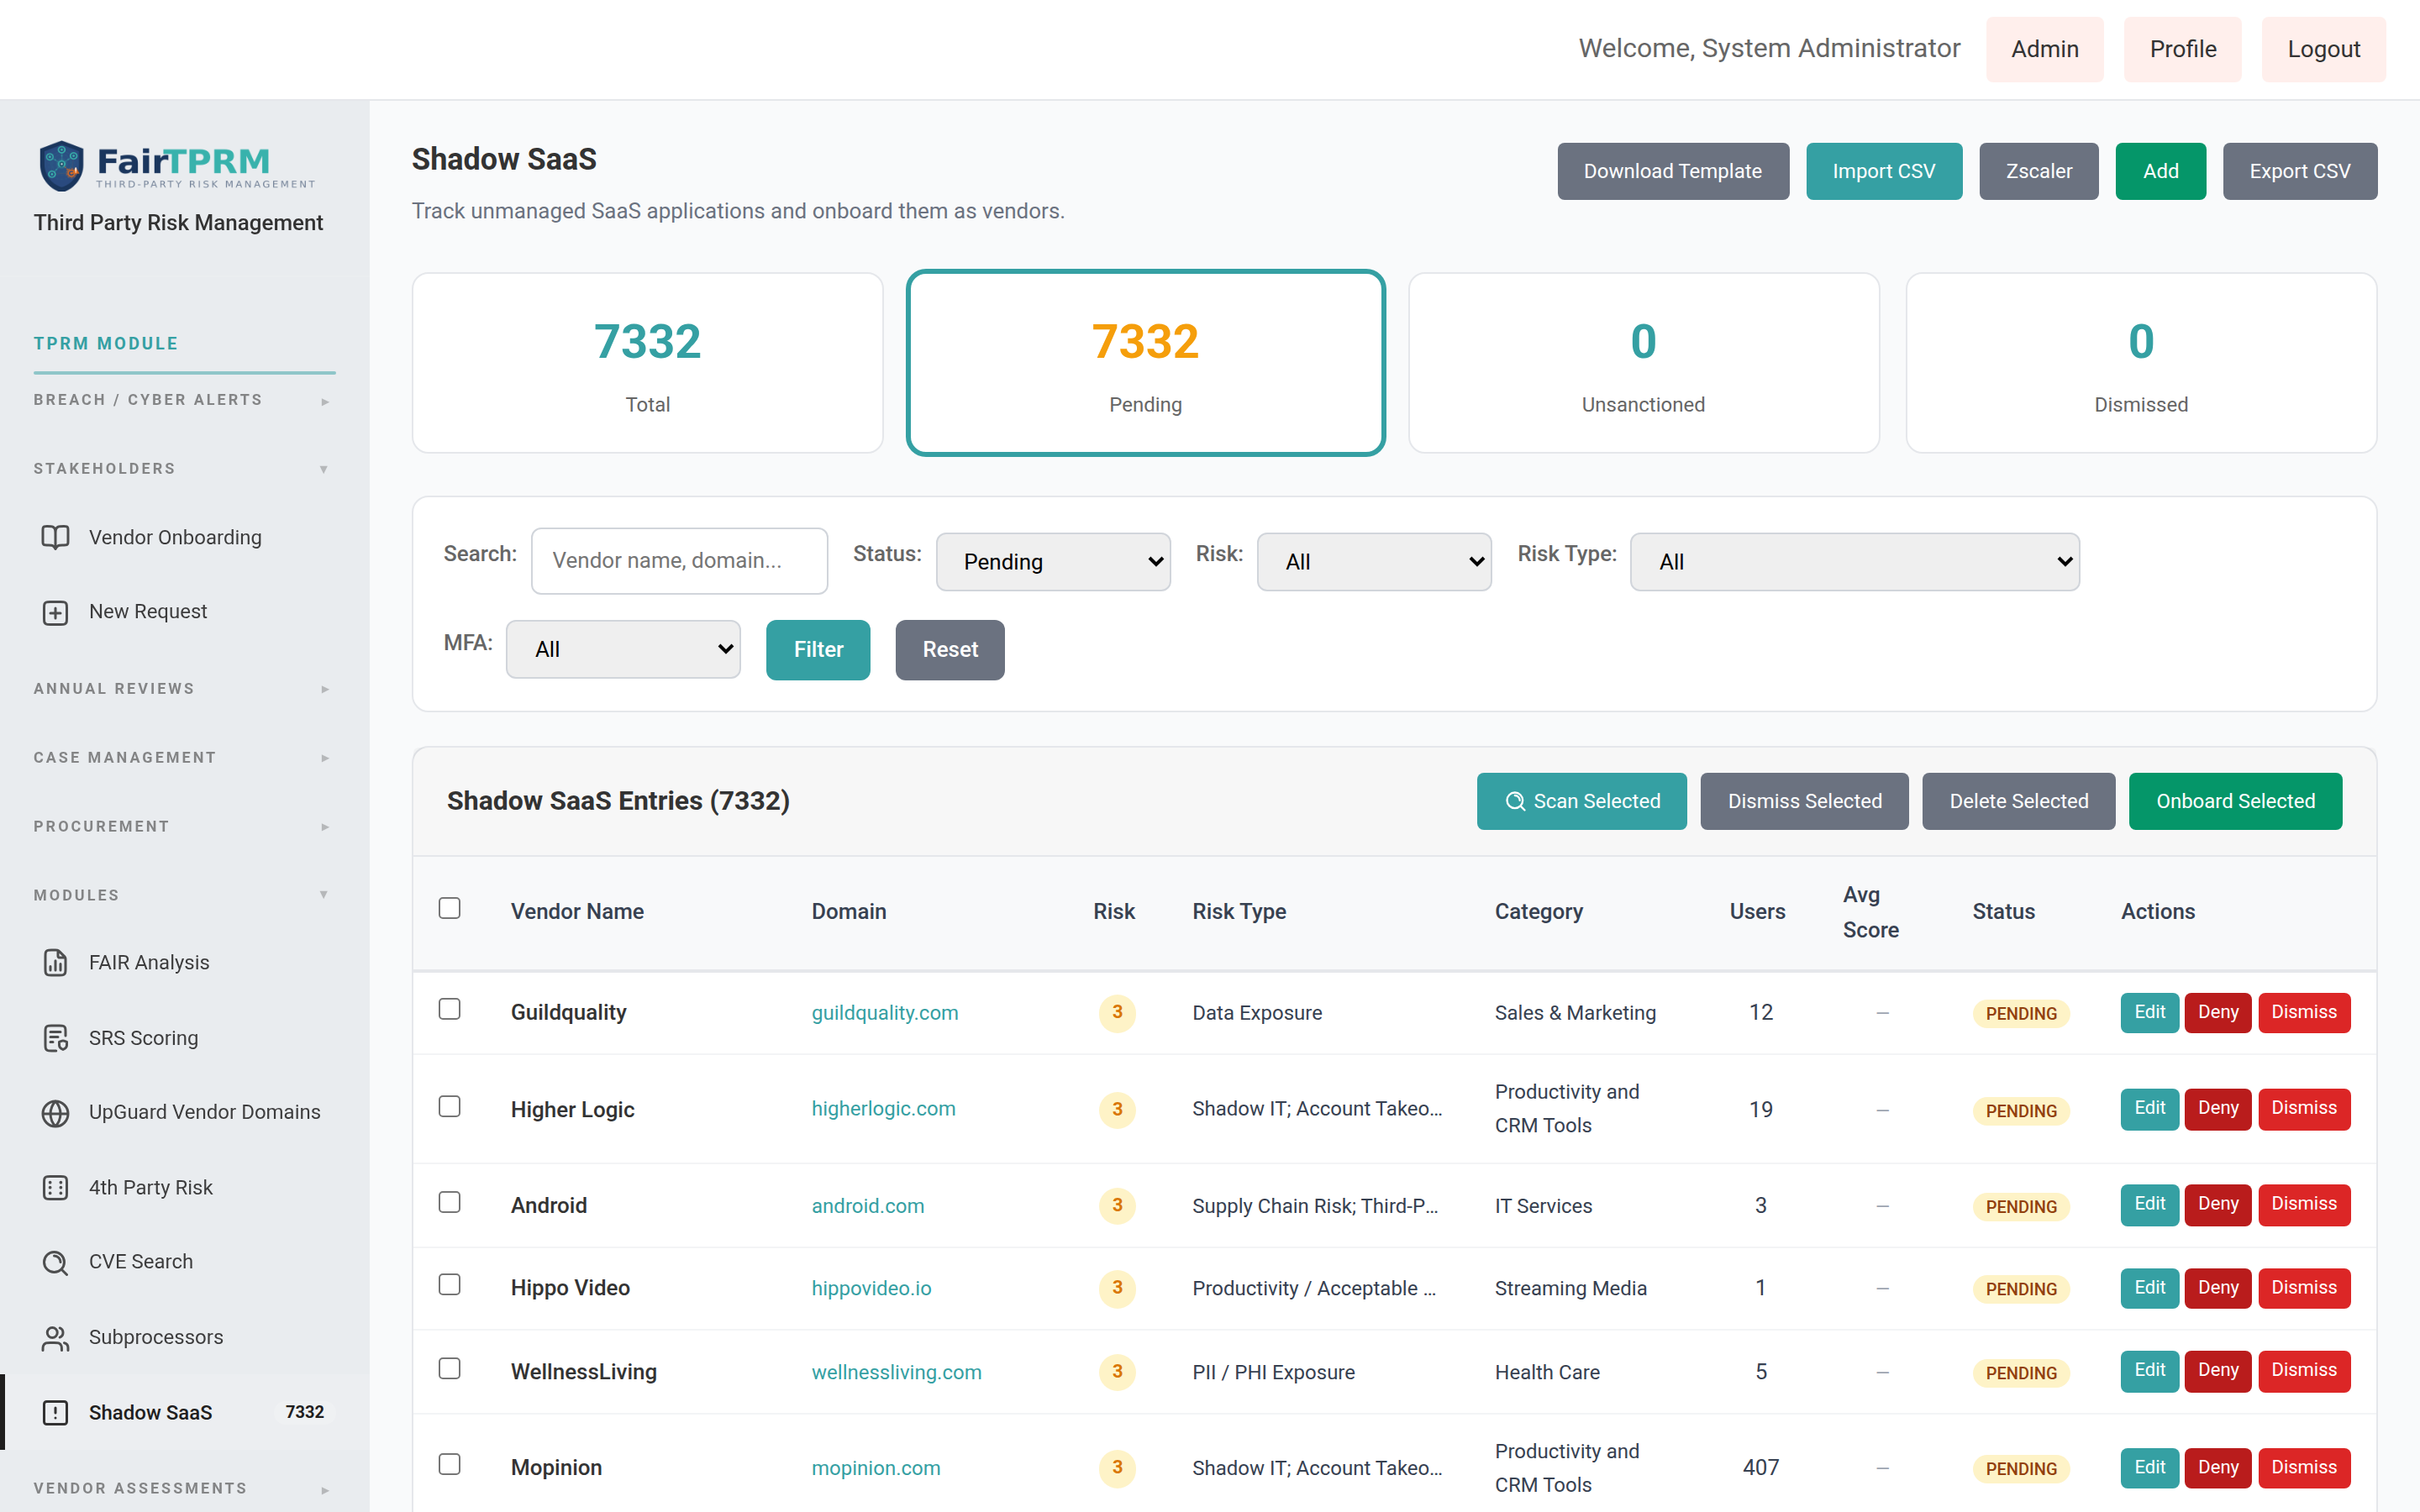
Shadow SaaS Discovery
Shadow SaaS discovery identifies unapproved SaaS applications in use across your organization. The feature detects cloud services that have not been formally onboarded through the TPRM process, enabling your security team to assess risk, enforce governance, and bring shadow applications under management. In v2.6.1, discovery can be automated with the Grip Security integration, and unsanctioned apps can be blocked through Zscaler.
Vendor Onboarding & Procurement Onboarding New in 2.6.1
A vendor onboarding request is how a new vendor enters the platform. It moves through a series of statuses from first draft to final decision. Before the cyber team will review a vendor, the vendor must first be onboarded through your procurement process and have a valid Vendor ID (VID).
The onboarding journey (statuses)
| Status | What it means |
|---|---|
| Draft | The request is being filled in. It has not been sent for review yet. |
| Submitted | The request passed the submission checks and has been sent to the cyber team. |
| In Review | The cyber team is reviewing the vendor. |
| AI Review | The vendor’s services use AI and it is in the dedicated AI review stage (see AI Review). |
| Evaluation | The vendor is being trialled or evaluated. |
| Approved | The vendor has been approved and is onboarded. |
| Rejected | The vendor was not approved. |
| Inactive | The vendor is no longer active. |
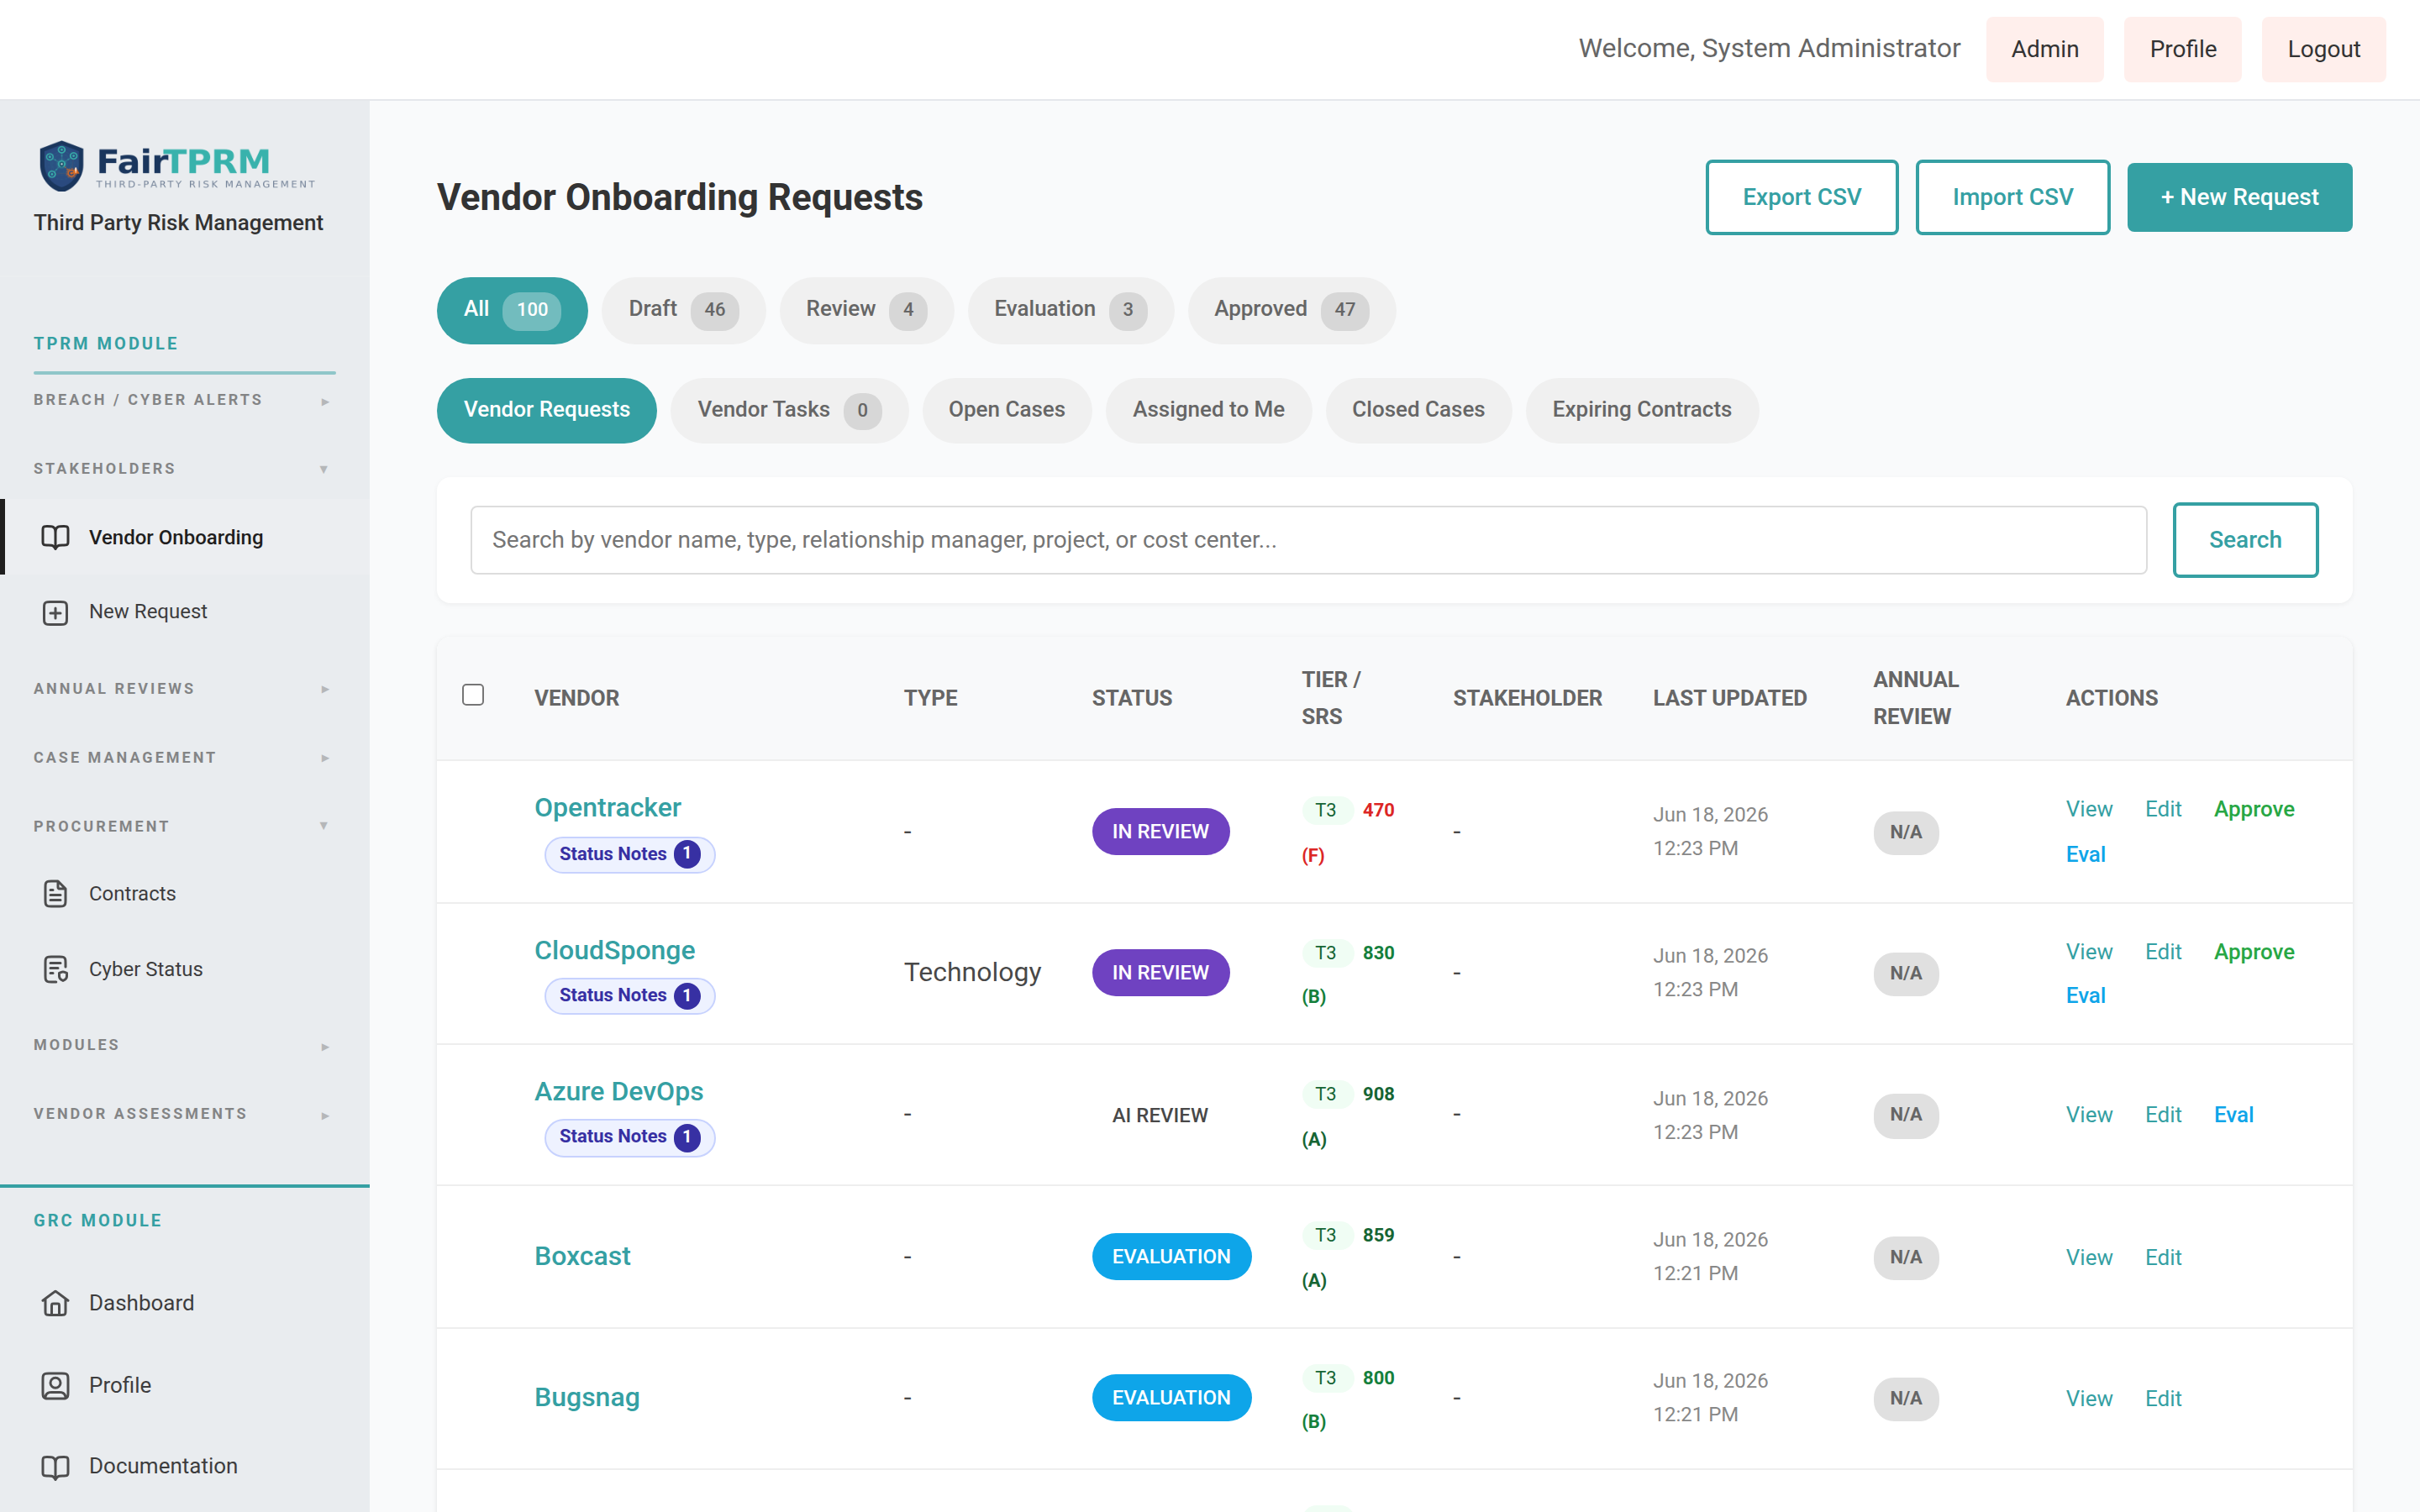
Finding your vendor requests
Go to → → . You will see a searchable list of vendors with their status, tier, security score (SRS), and quick actions. Use the filter pills at the top (for example All, Approved, Review) to narrow the list, or click + New Request to start a new vendor. The Review pill combines both In Review and AI Review vendors.
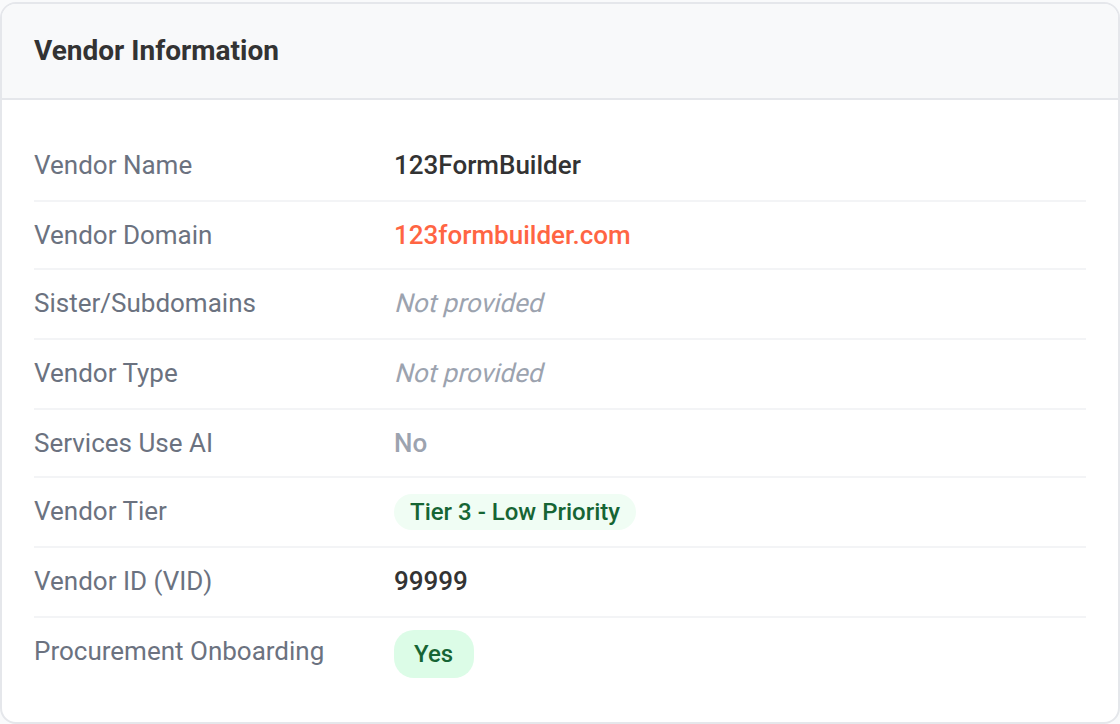
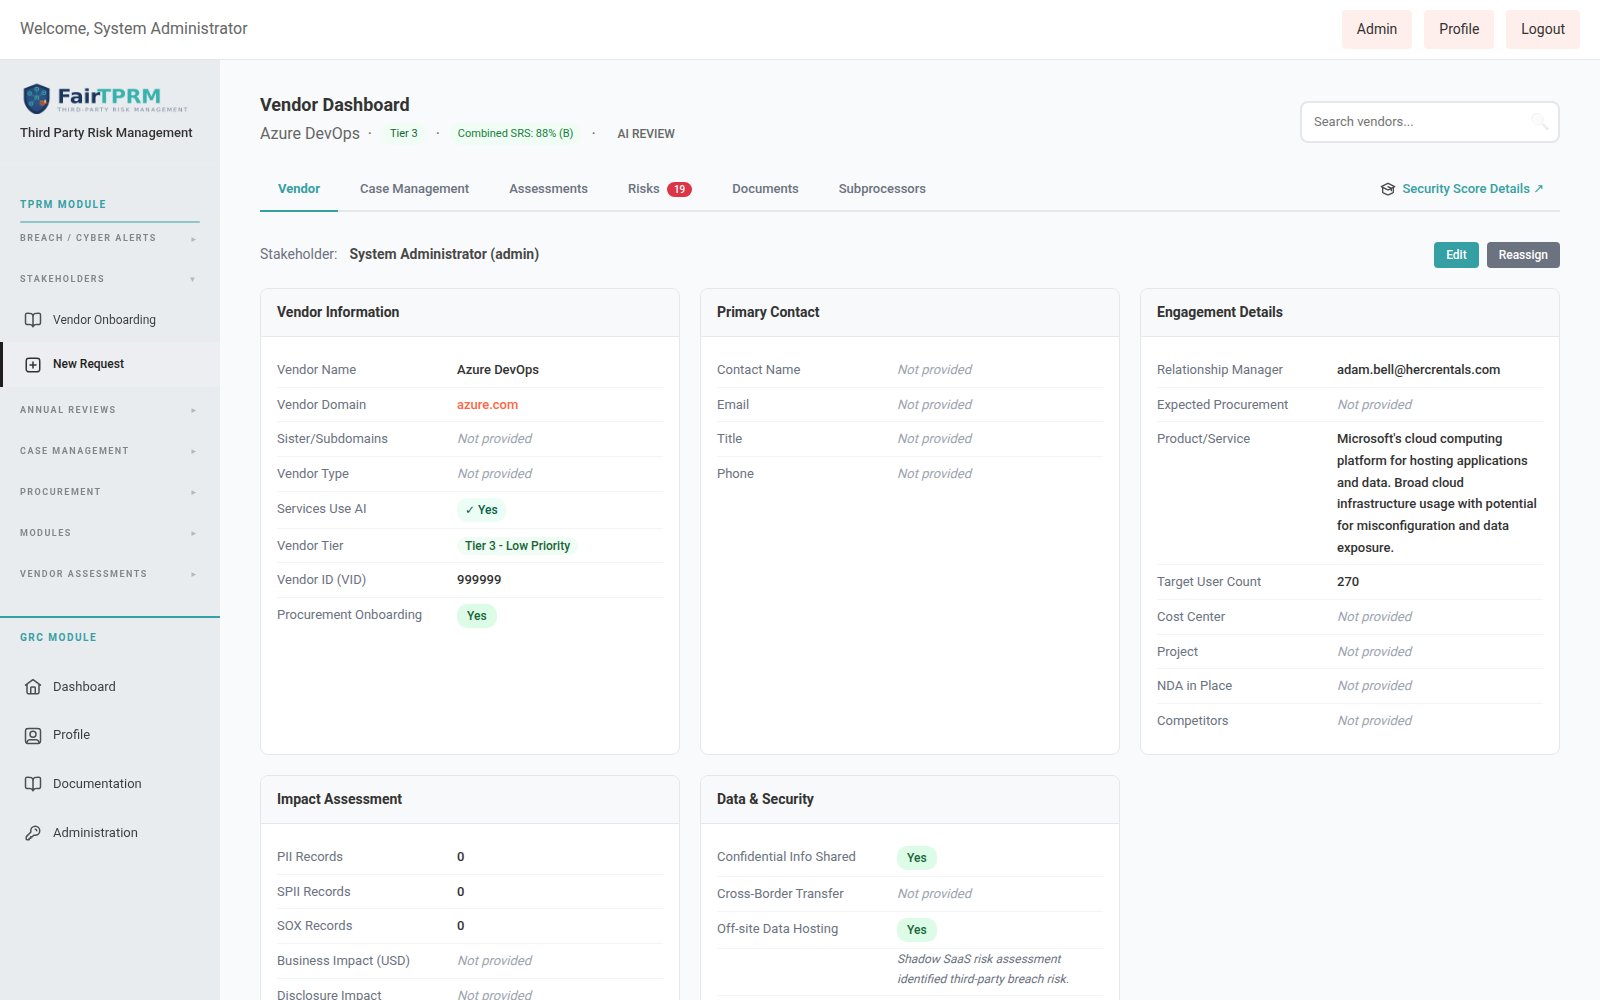
The two things every vendor needs before review
Open a vendor and look at the Vendor Information card. Two fields control whether the vendor can be submitted for cyber review:
- Procurement Onboarding — a Yes/No field answering “Has this vendor completed Procurement Onboarding?” This must be set to Yes.
- Vendor ID (VID) — the 4–8 digit identifier assigned to the vendor by your procurement system. This must be a valid 4–8 digit number.
AI Review for Vendors New in 2.6.1
Some vendors provide services that use artificial intelligence. These vendors can carry different risks, so v2.6.1 adds a dedicated AI Review status to track them separately during the review process.
How a vendor enters AI Review
On the Vendor Information card there is a Services Use AI field. When this is set to Yes, an authorized reviewer (a Cyber TPRM user or Administrator, while editing the vendor) sees a Force AI Review link directly beneath that field.
- Open the vendor and confirm Services Use AI is set to Yes.
- Click Force AI Review and confirm the prompt: “Force this vendor into AI Review?”
- The vendor’s status changes to AI Review.
Procurement Cyber Status New in 2.6.1
The Cyber Status page gives the procurement team a simple, always-current view of which vendors the cyber team is reviewing and what the latest word is on each one — without needing access to the full security tooling. The cyber team posts short, dated updates; procurement reads them here (and in a weekly email). Open it from → → . It is available to Procurement, Cyber TPRM, and Administrator users.
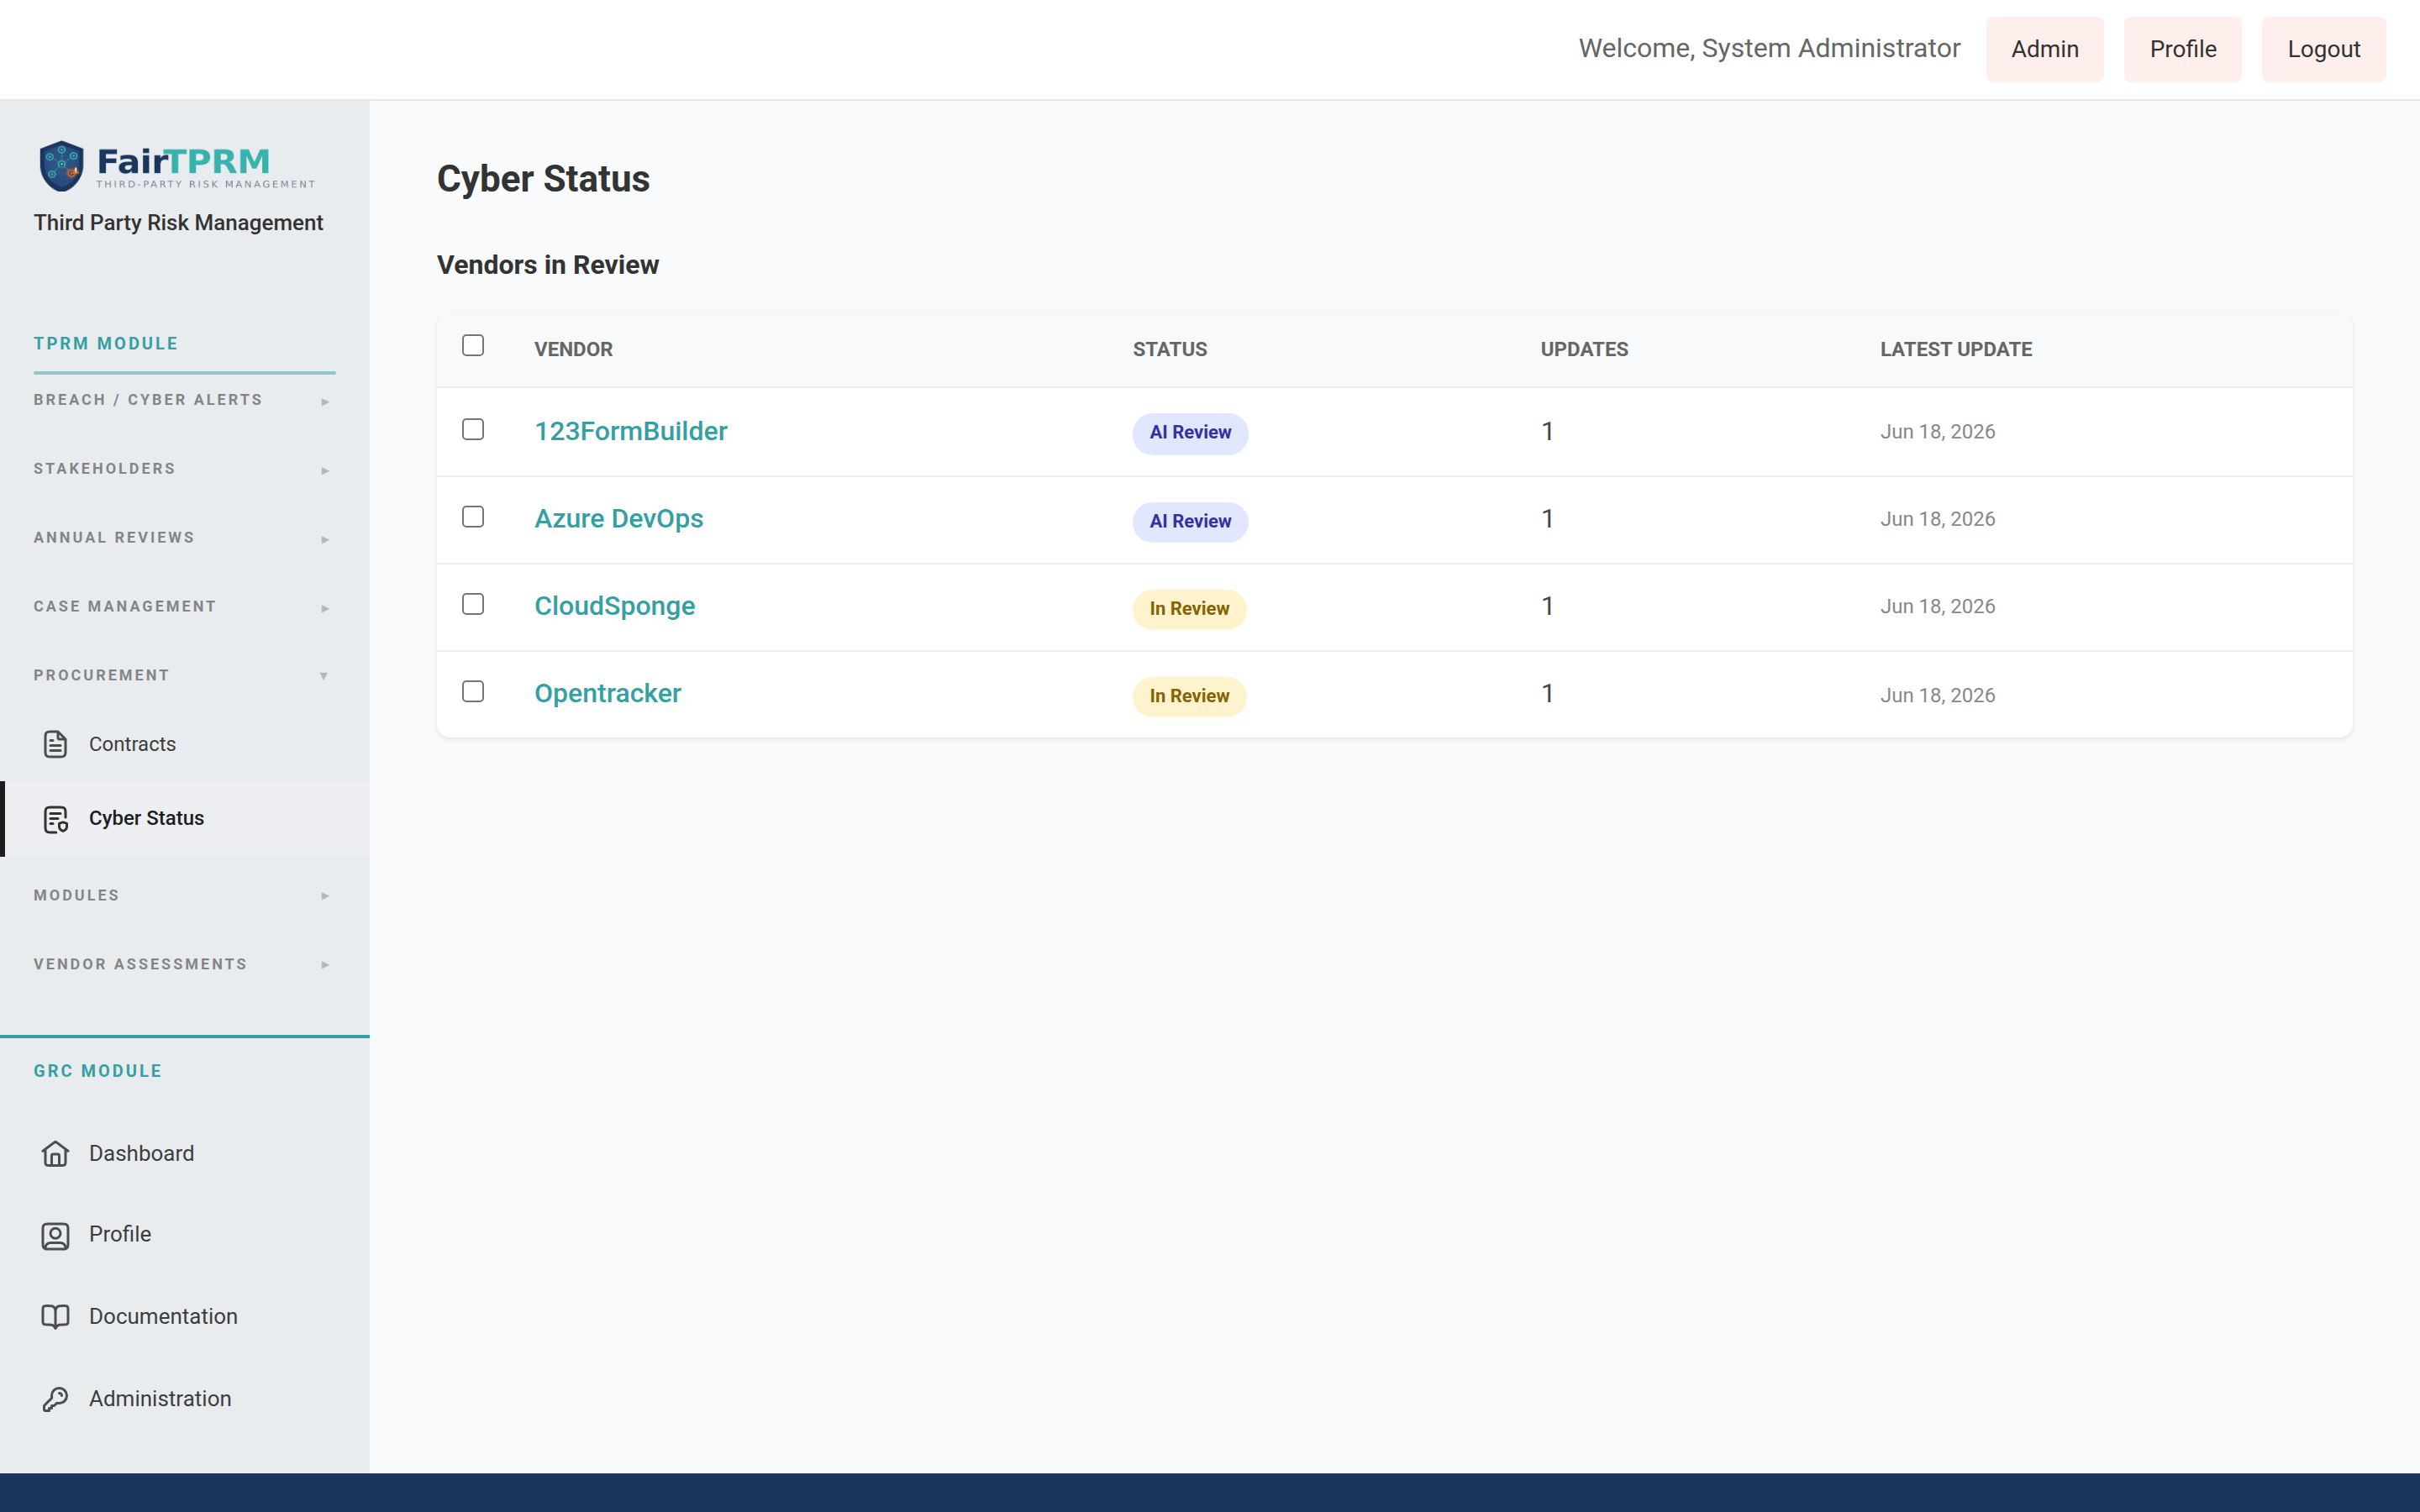
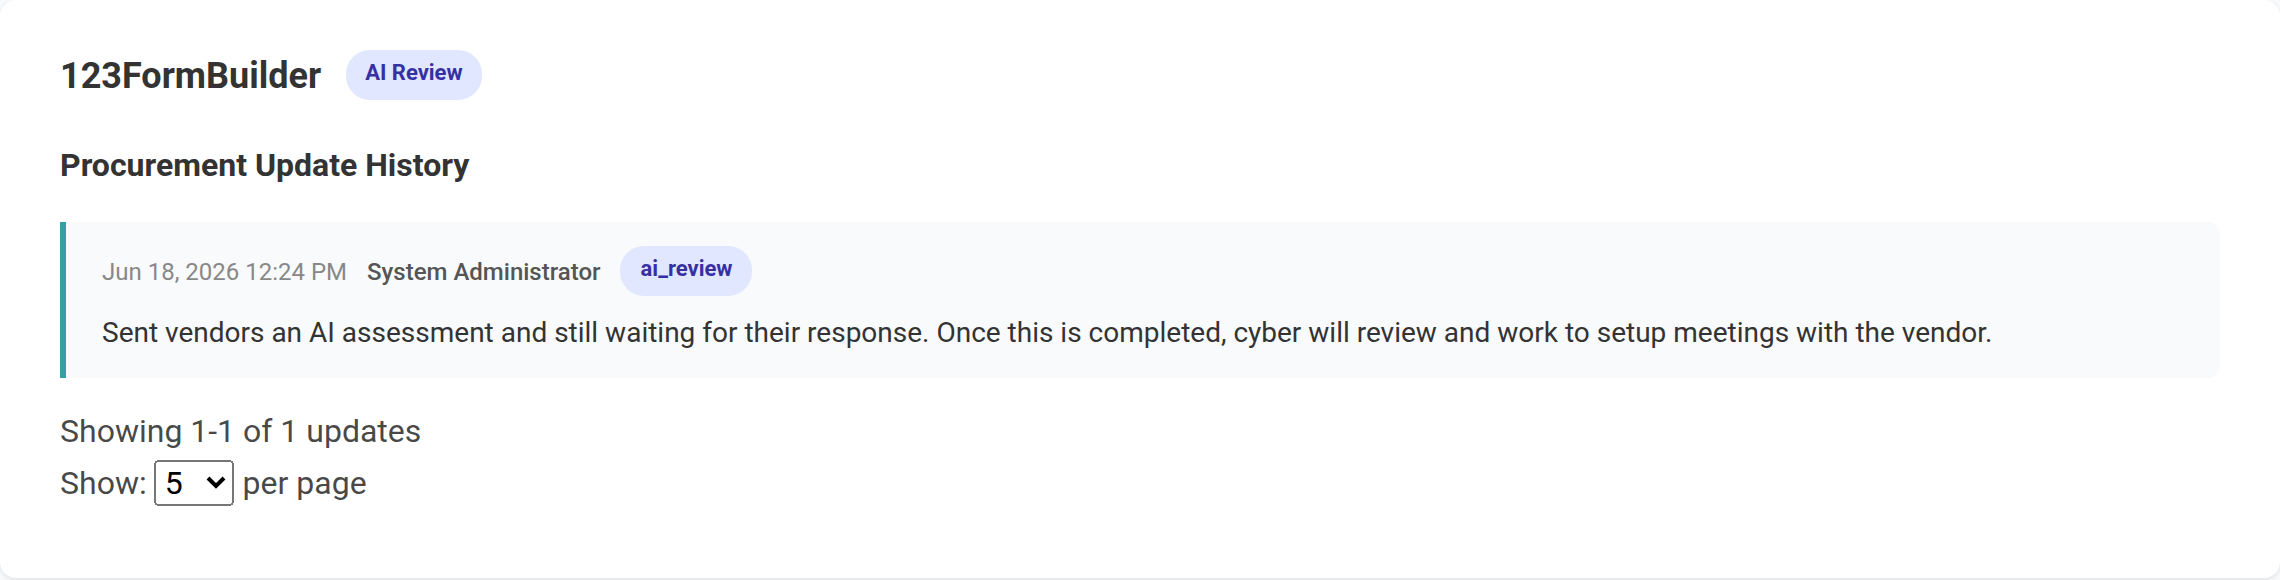
Reading a vendor’s update history
Click a vendor’s name in the Vendors in Review table. The Procurement Update History panel opens, showing every update newest-first: the date and time, who wrote it, the vendor’s status at that time, and the note itself.
For cyber reviewers: posting an update to procurement
- On the Cyber Status page, tick the checkbox next to each vendor you want to update.
- Click Provide Procurement with Update.
- Type your note in the Update box.
- Optionally use Change status to move the vendor(s) forward (for example to Evaluation, Approved, or Rejected). Leave it on Keep current status to only add a note.
- Click Save Update. The update is recorded against every selected vendor.
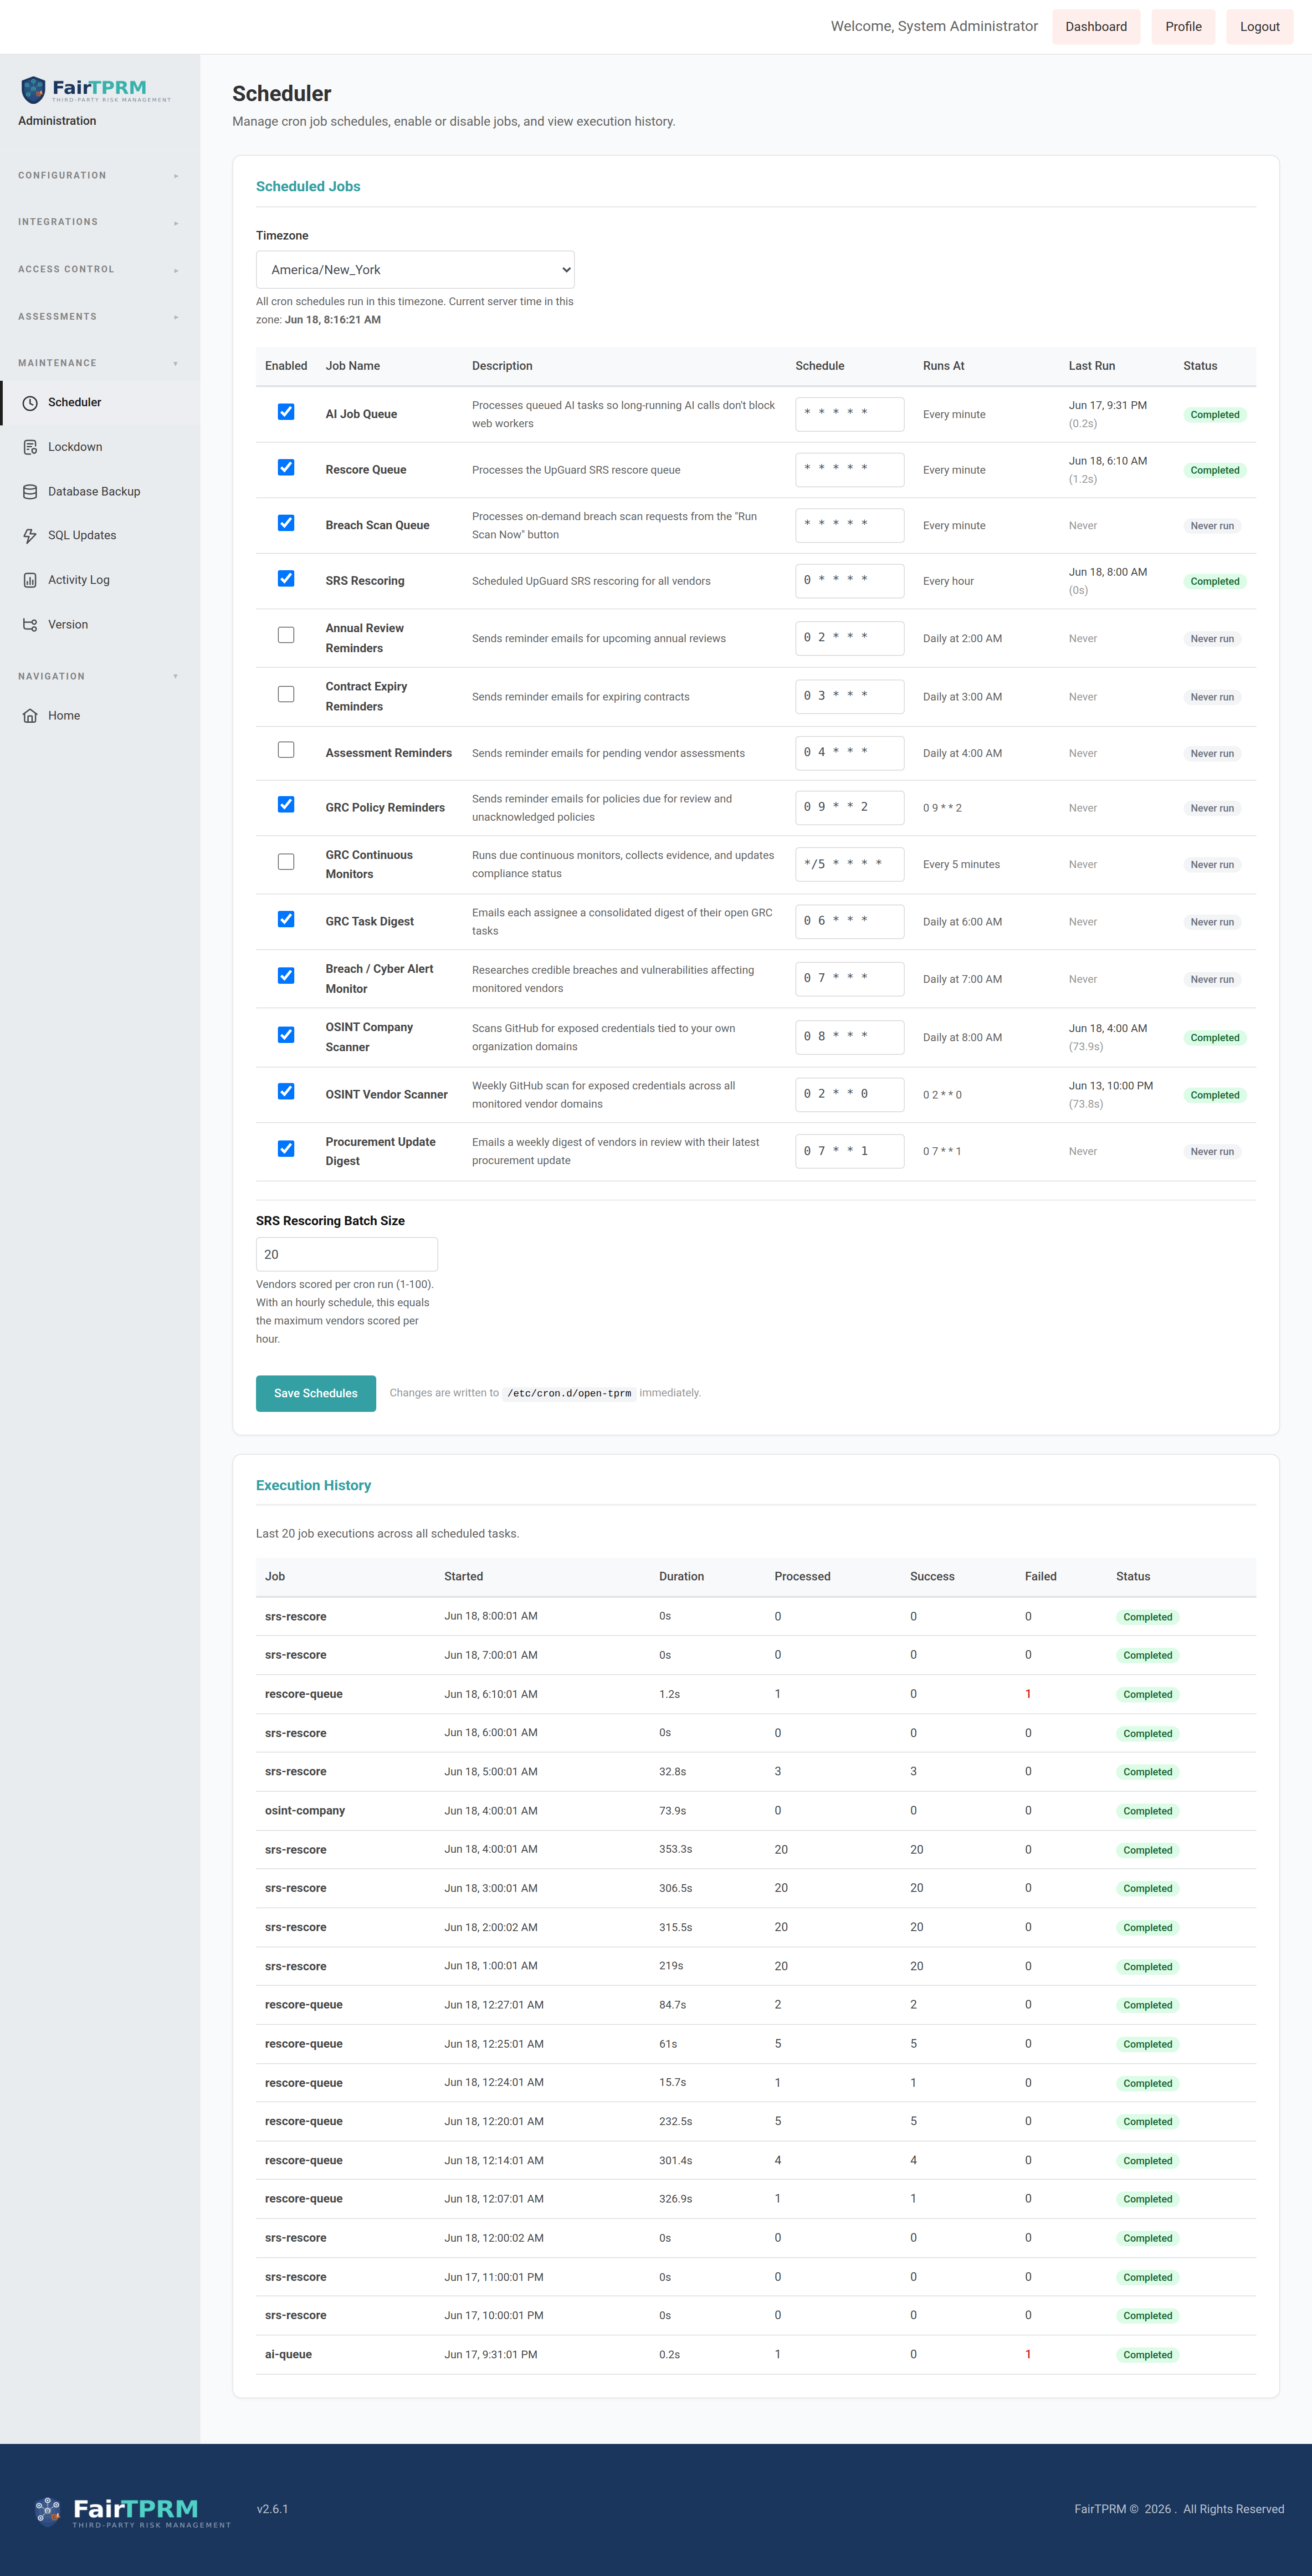
The weekly procurement digest email
A scheduled job emails procurement a weekly digest summarizing vendors in review and their latest updates. Administrators manage it from → via the Procurement Update Digest job.
Grip Security Integration (Shadow SaaS) New in 2.6.1
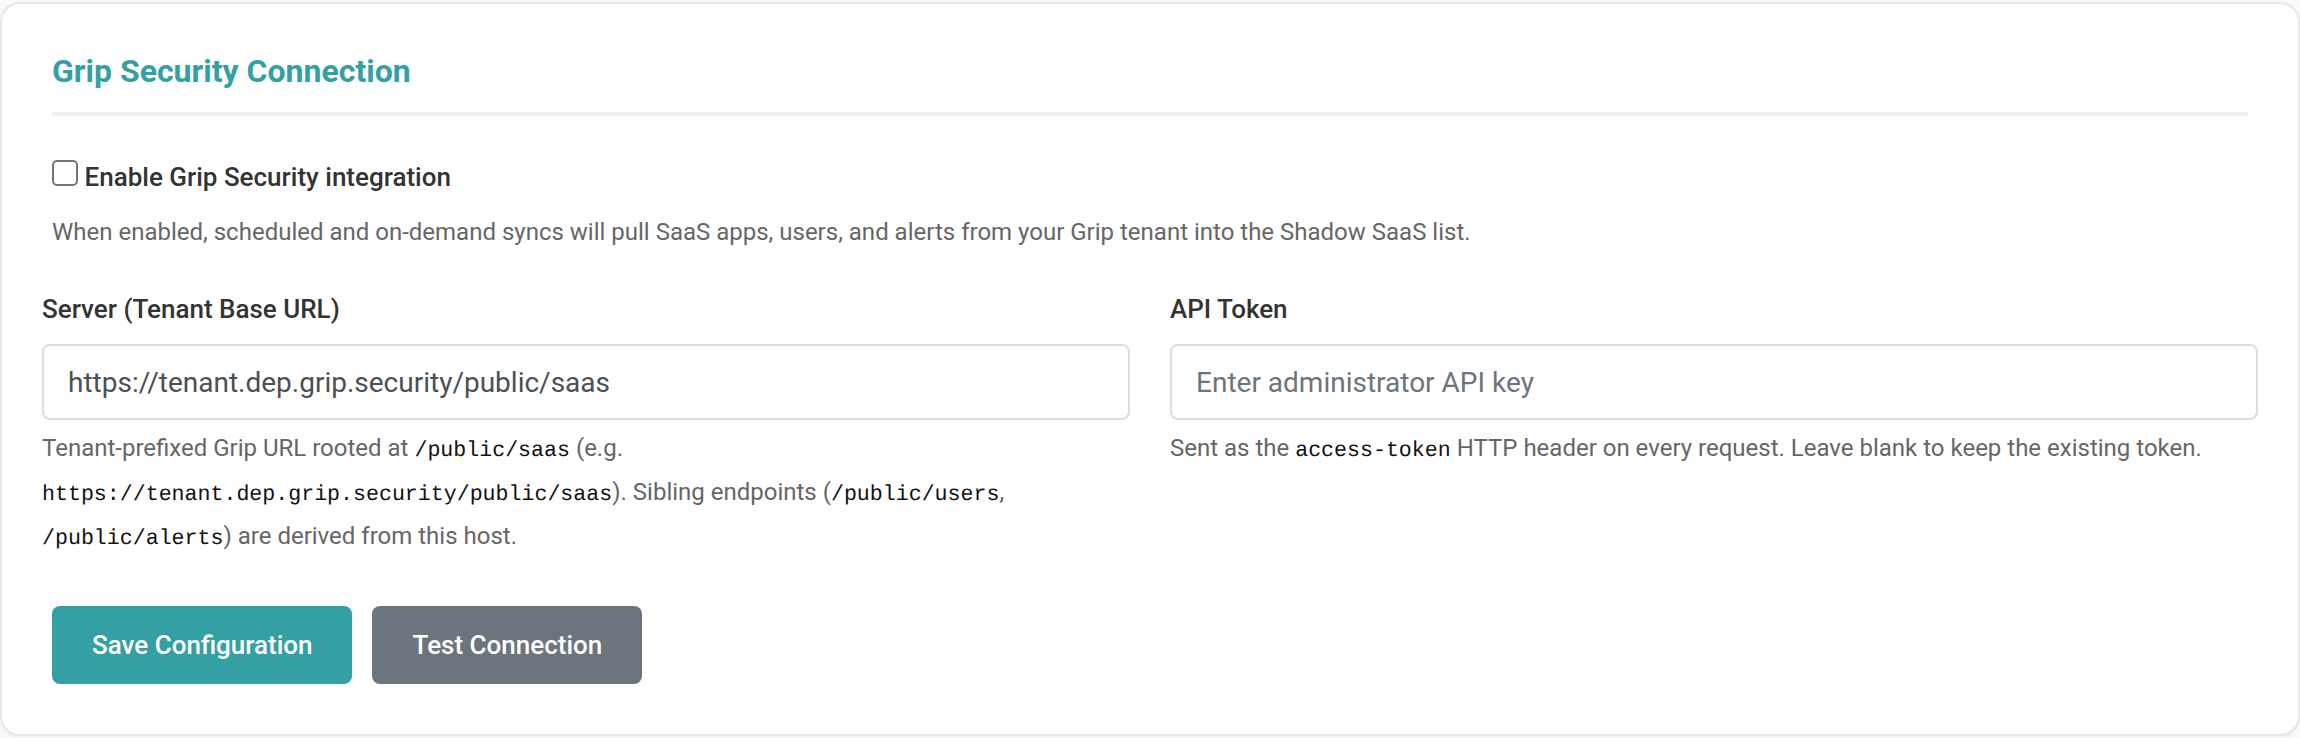
“Shadow SaaS” means cloud apps that employees use which were never formally approved. Grip Security is a service that discovers these apps. In v2.6.1 you can connect your Grip account so the platform automatically pulls in the apps Grip finds — along with how many people use each one, a risk score, and security alerts — and lists them on your Shadow SaaS page. It is configured by an administrator at → .
Connecting Grip
- In Grip, create an API token and note your tenant’s base URL (it ends in
/public/saas, for examplehttps://acme.dep.grip.security/public/saas). - In the platform, go to → and find the Grip Security Connection card.
- Tick Enable Grip Security integration.
- Paste your tenant URL into Server (Tenant Base URL) and your token into API Token.
- Click Save Configuration, then Test Connection to confirm.
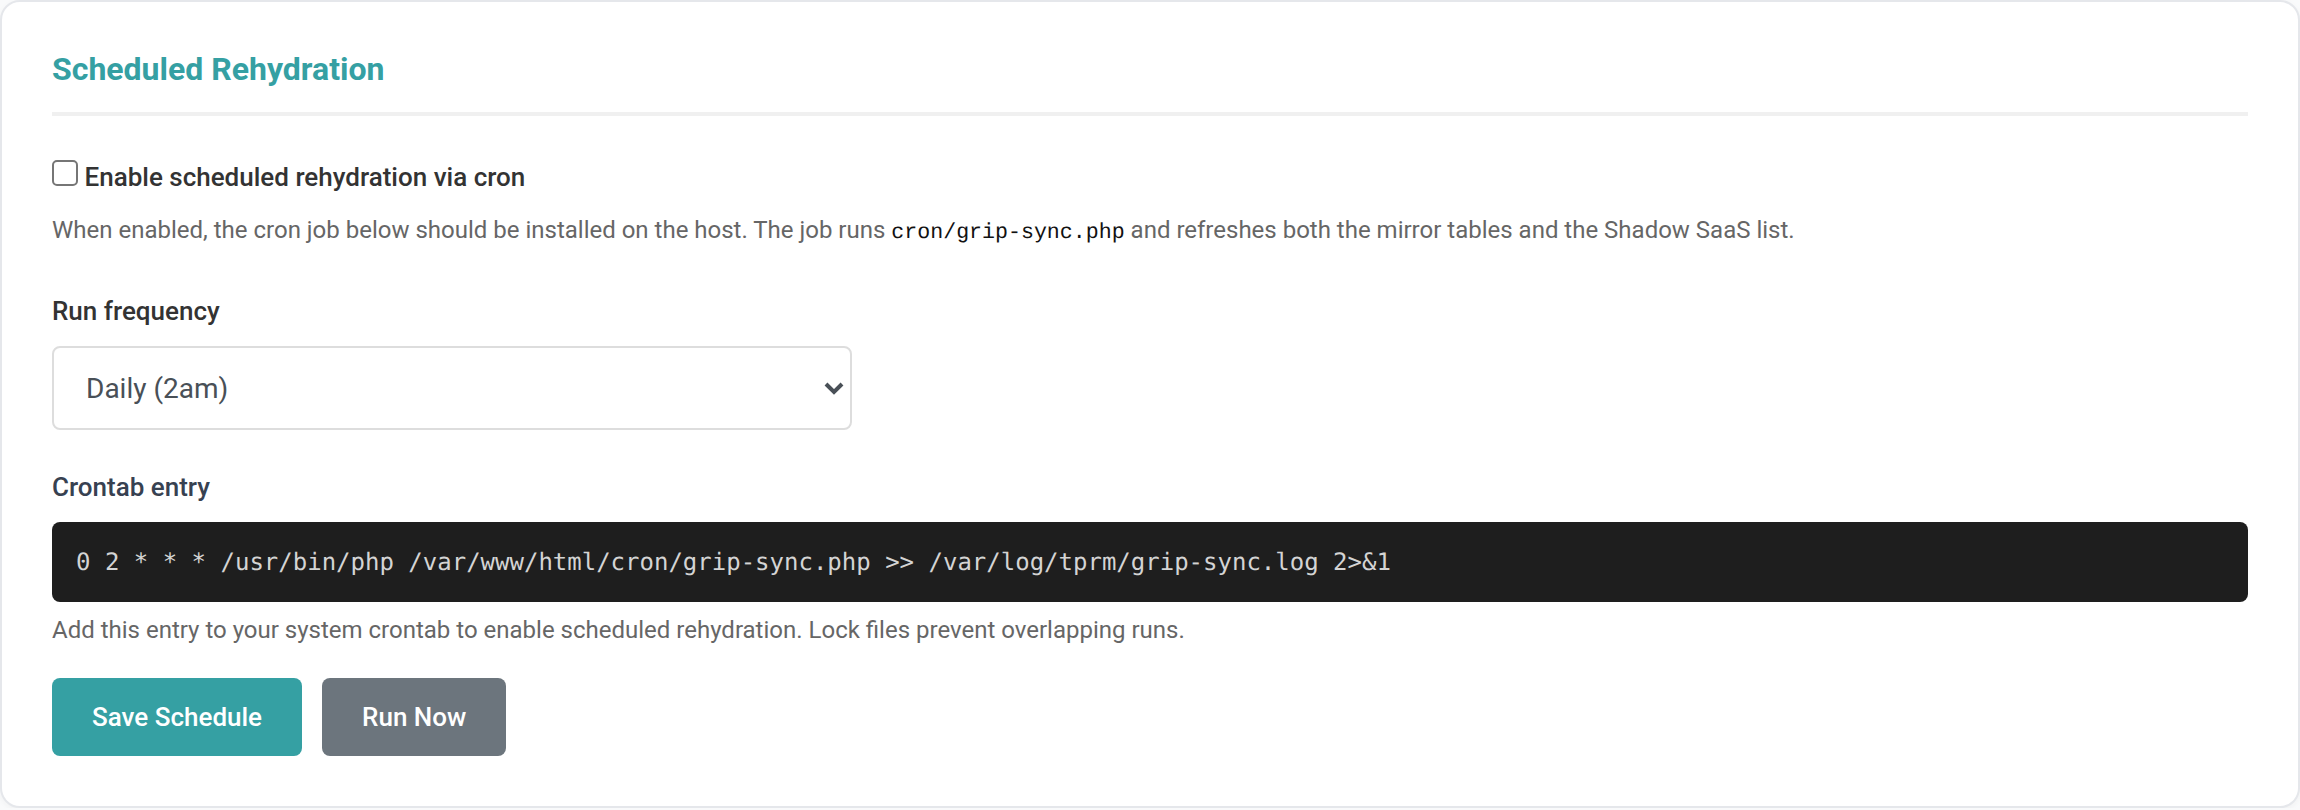
Keeping it up to date automatically
Use the Scheduled Rehydration card to have the platform refresh Grip data on a schedule. Tick Enable scheduled rehydration via cron and choose a Run frequency (Hourly, Every 6 hours, Every 12 hours, Daily, or Weekly). You can also click Run Now to refresh immediately.
Zscaler Blocking Integration New in 2.6.1
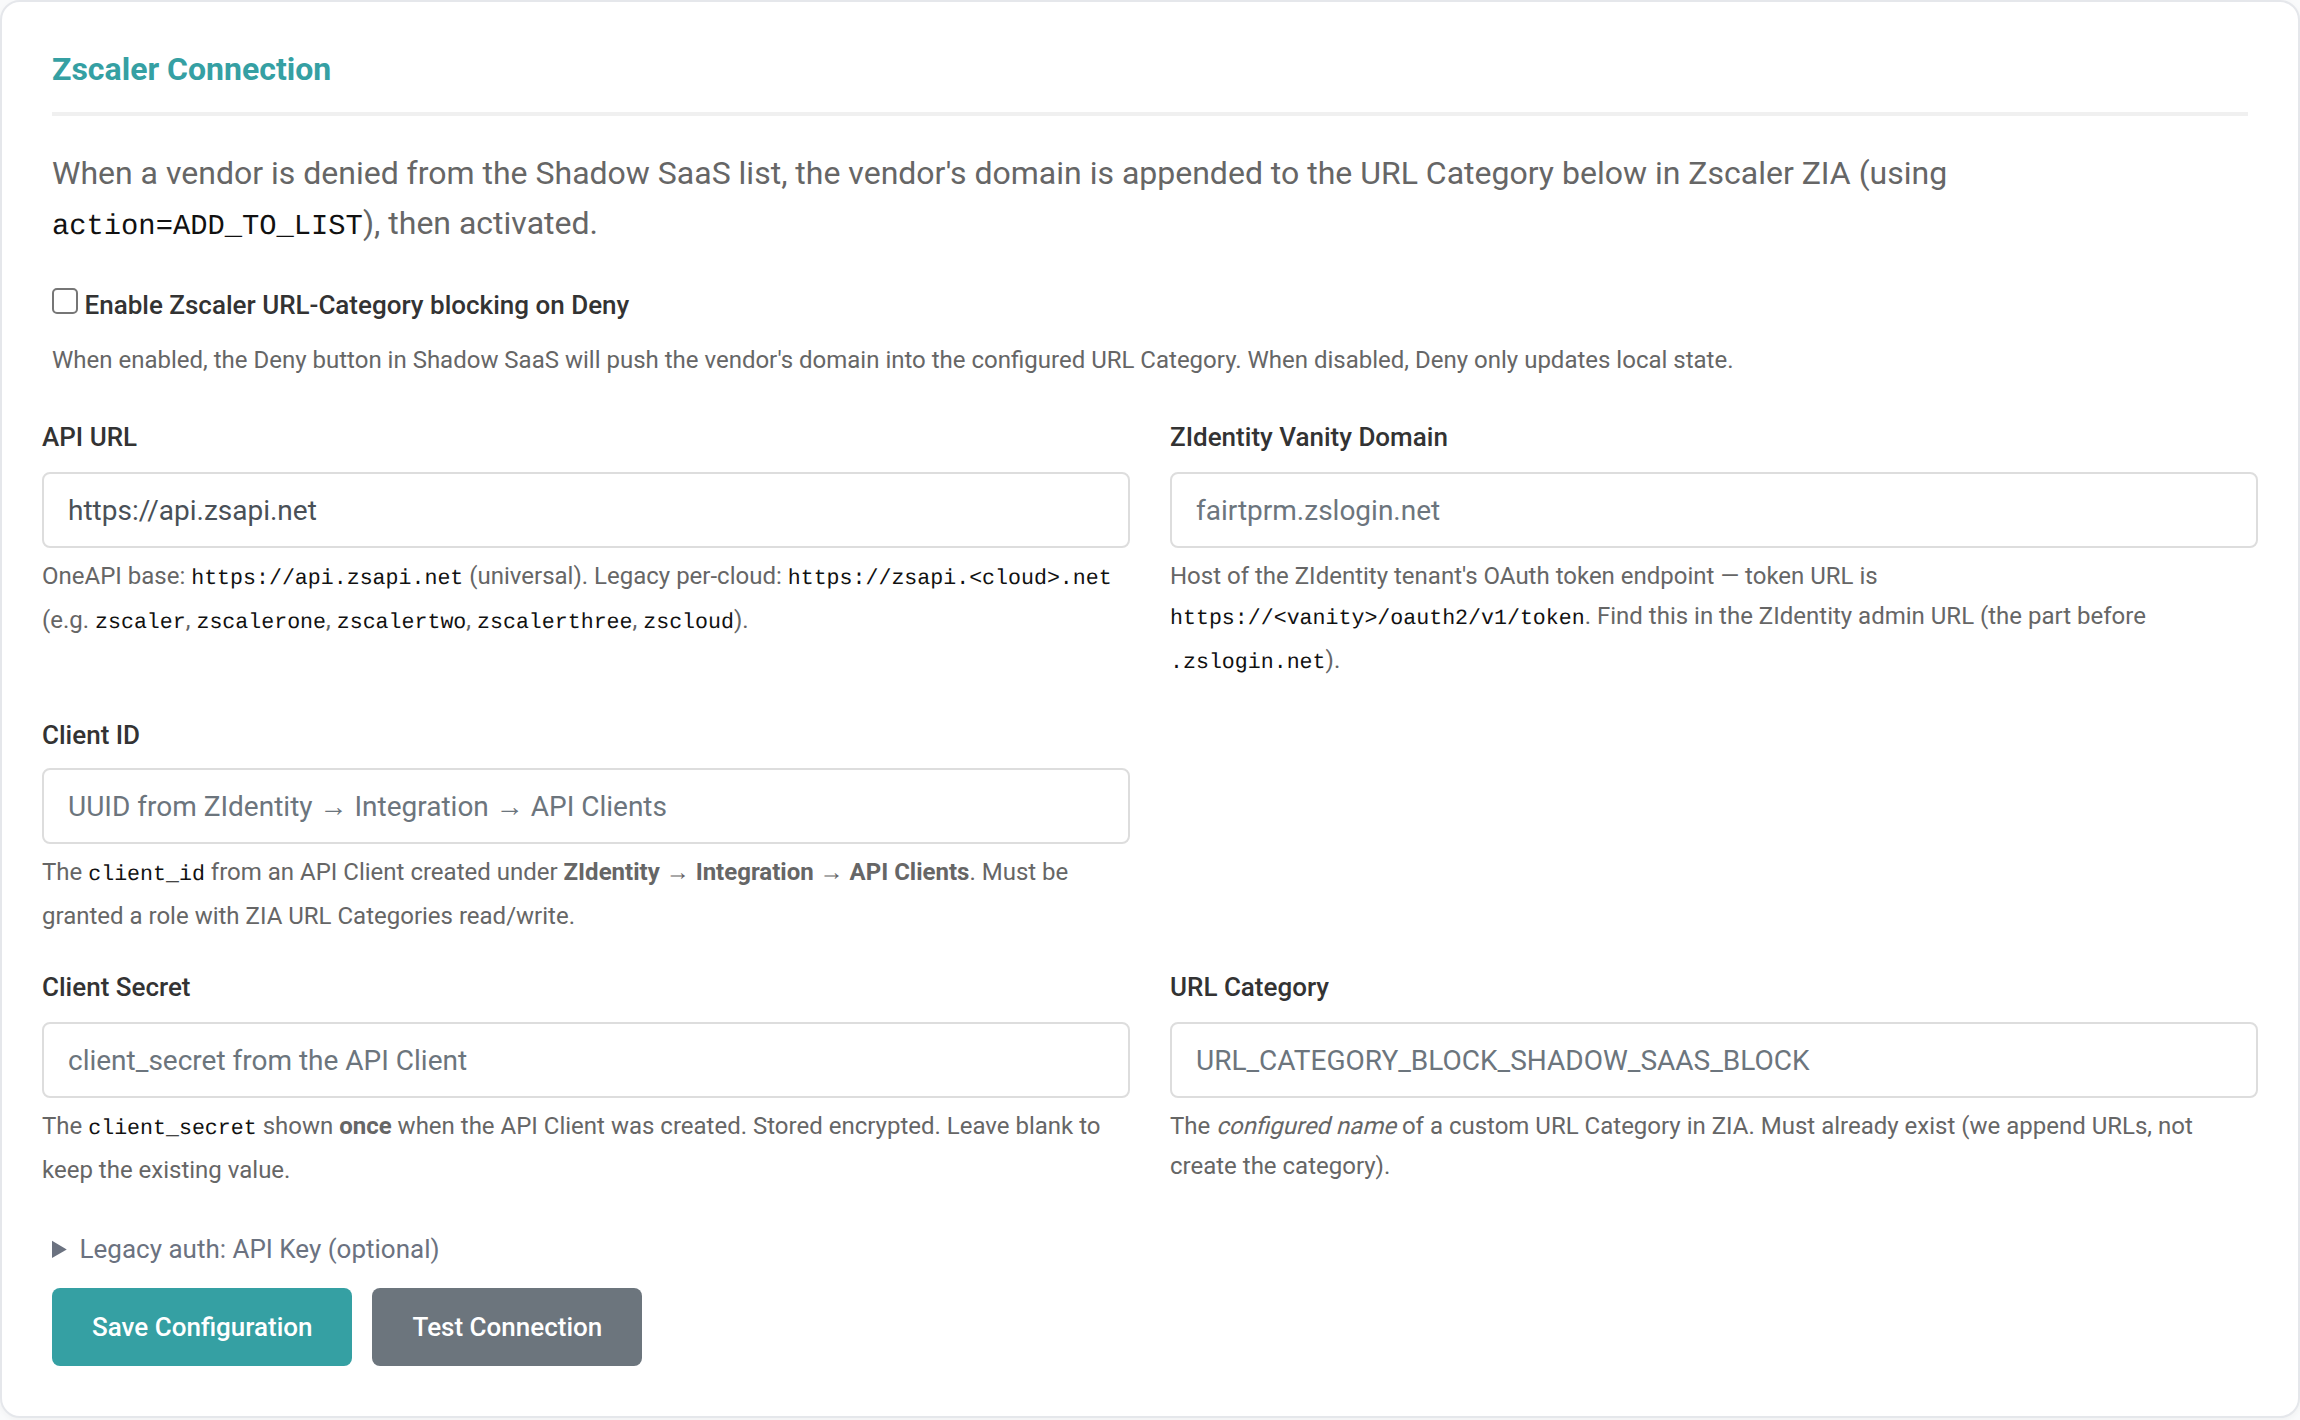
Zscaler is a web-security service that can block access to websites. With this integration, when you Deny an unsanctioned app on the Shadow SaaS page, the platform can automatically add that app’s web domain to a blocking list (URL Category) in your Zscaler account — so people can no longer reach it. Clicking Allow later removes the block. It is configured by an administrator at → , on the Zscaler Connection card.
Connecting Zscaler
- In Zscaler (ZIdentity), create an API Client and copy its Client ID and Client Secret. Note your vanity domain (the part before
.zslogin.net). - In ZIA, create (or pick) a custom URL Category that the blocked domains will be added to, and note its exact name.
- In the platform’s Zscaler Connection card, tick Enable Zscaler URL-Category blocking on Deny.
- Fill in API URL (default
https://api.zsapi.net), ZIdentity Vanity Domain, Client ID, Client Secret, and the URL Category name. - Click Save Configuration, then Test Connection to confirm the credentials work.
General Settings
The General Settings page (Admin → Settings → General) allows administrators to configure core platform settings including the Application Name, Company Name, and Support Email address. These values appear throughout the platform interface and in system-generated emails.
Branding & Theme
Customize the platform’s appearance from Admin → Settings → Branding. Upload your organization’s logo, set primary and accent colors, and adjust the sidebar navigation width. Branding changes take effect immediately for all users.
User Management
Manage user accounts from Admin → Users. Administrators can create new users, assign them to one or more ACL groups, enable or disable TOTP two-factor authentication, and deactivate accounts. Group membership determines which modules and actions each user can access.
- Navigate to → .
- Click a user to edit, or click Add User to create a new account.
- In the ACL Groups section, check the groups this user should belong to.
- Click Save to apply changes.
Email Configuration
Configure outbound email from Admin → Settings → Email. Enter your SMTP server details including host, port, encryption method (TLS/SSL), username, and password. The platform uses email for vendor assessment invitations, task notifications, password resets, and audit reminders.
SAML / SSO
Fair TPRM supports SAML 2.0 single sign-on for enterprise identity providers. Configure SSO from Admin → Settings → SAML. You will need to provide the IdP Entity ID, SSO URL, SLO URL, and X.509 certificate from your identity provider. SCIM 2.0 provisioning is also supported for automated user lifecycle management.
AI Integration
Fair TPRM offers optional AI-powered features for generating executive risk summaries, suggesting control descriptions, and analyzing assessment gaps. Configure AI integration from Admin → Settings → AI. The platform supports integration with compatible AI services, and all AI features can be enabled or disabled individually.
Recommended: Self-Host OpenWebUI or LibreChat
For full control over your AI integration, we recommend self-hosting OpenWebUI or LibreChat alongside Fair TPRM. Both are free, open-source AI front-ends that run as a single Docker container and are compatible with Fair TPRM’s AI integration settings.
Setup overview:
- Deploy OpenWebUI or LibreChat — Run the Docker image on the same server as Fair TPRM or on a separate host. Both support Docker Compose for easy deployment.
- Configure an LLM provider — Connect to OpenAI, Anthropic, a local Ollama instance, or any OpenAI-compatible API endpoint.
- Point Fair TPRM to your AI service — In Admin → Settings → AI, enter the URL of your self-hosted AI instance and your API key.
- Enable AI features — Toggle individual AI capabilities: executive summaries, control suggestions, and gap analysis.
Cost: $0 for self-hosted OpenWebUI or LibreChat. If using a cloud LLM provider, costs depend on your API usage (typically a few dollars per month for moderate use). Fully local models via Ollama are completely free.
Security Rating Services: Shodan API
For continuous external security scoring, Fair TPRM integrates with the Shodan API. A Shodan membership (approximately $59/month) gives Fair TPRM automated Security Rating Scores for your entire vendor portfolio — including TLS analysis, CVE detection, network security, and application hardening.
Configure the Shodan API key in Admin → Settings → SRS. Shodan is automatically provisioned for free during the hosted demo.
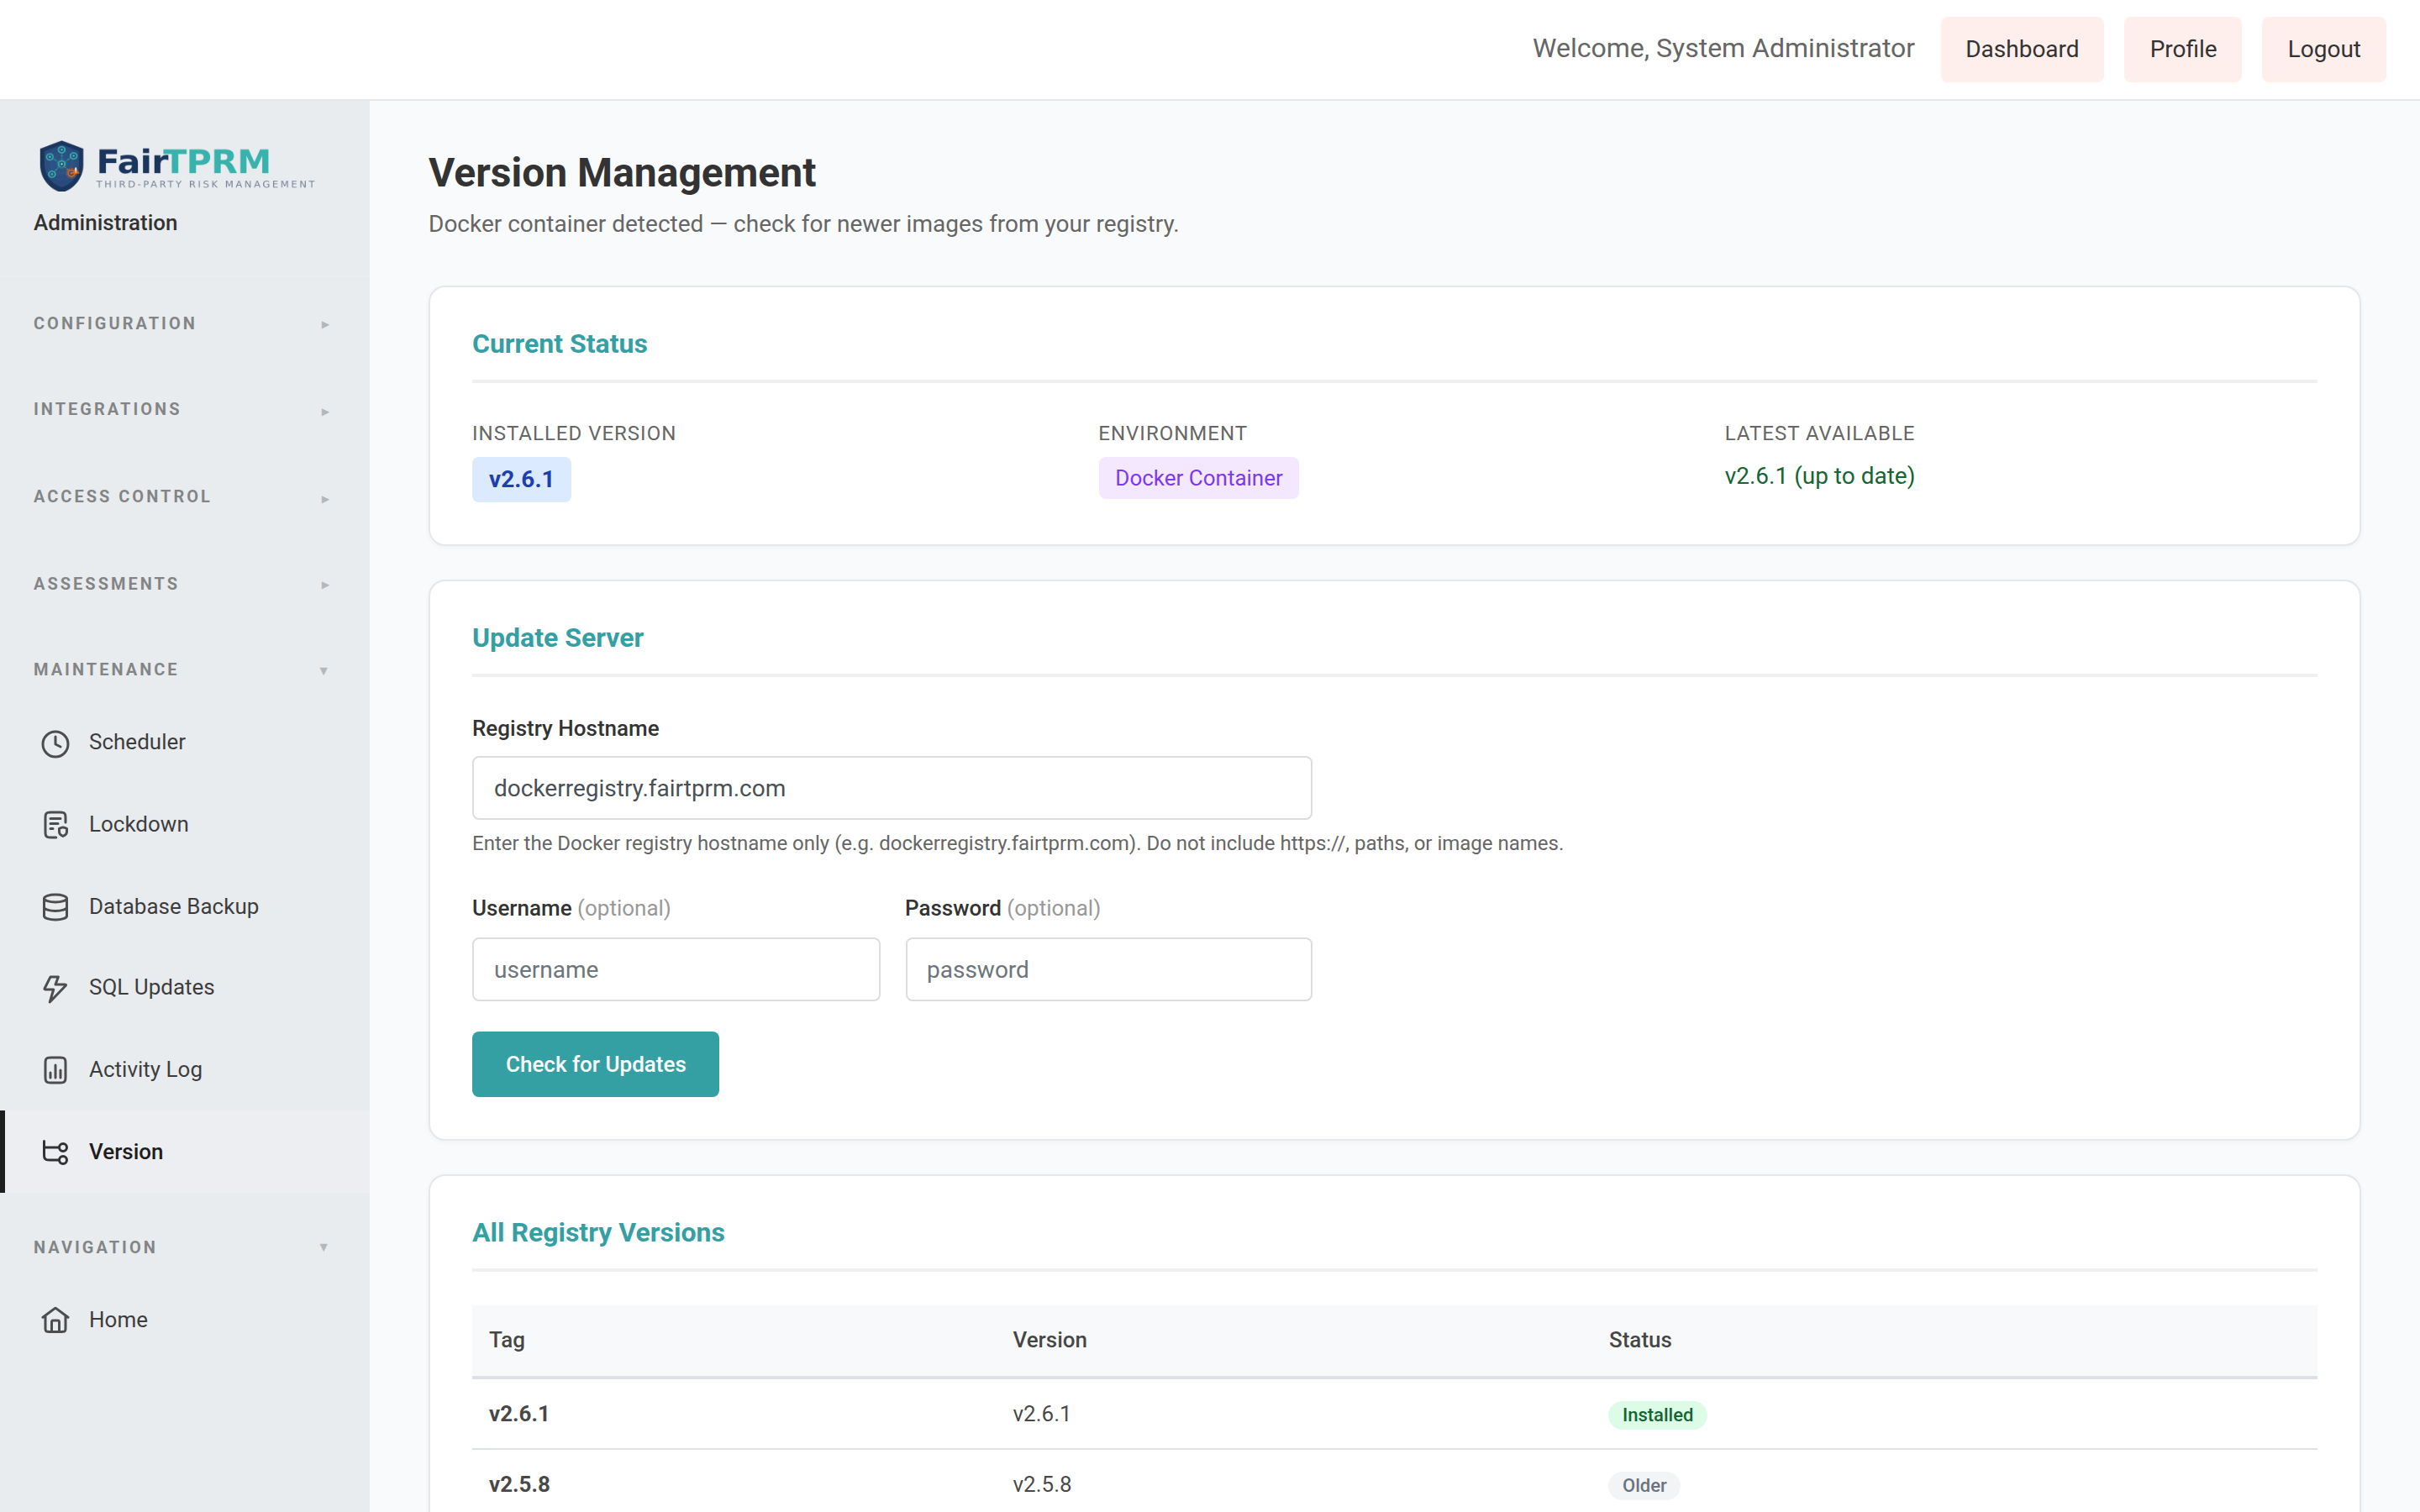
Updating the Platform New in 2.6.1
Administrators can check for and apply new versions from inside the platform. Navigate to → .
- The Current Status card shows your Installed Version and whether a newer one is available.
- Confirm the Registry Hostname is correct (your image registry), then click Check for Updates.
- If a newer version is listed, follow the on-screen Upgrade action to apply it.
Glossary
| Term | Definition |
|---|---|
| ACL | Access Control List — defines which permissions are granted to each user group. |
| AI Review | A dedicated vendor review status (new in v2.6.1) for vendors whose services use artificial intelligence; entered via the “Force AI Review” action. |
| Assessment | A structured evaluation of security maturity using the 170+ unified questions across 14 domains. |
| CIS Controls | Center for Internet Security Controls — a set of prioritized cybersecurity best practices (v8 supported). |
| CMMC | Cybersecurity Maturity Model Certification — a US Department of Defense framework for contractor security. |
| Conformity Status | The compliance state of a requirement: Conforming, Partial, Non-Conforming, or Not Applicable. |
| Control | A security measure implemented to mitigate risk, mapped to one or more framework requirements. |
| Crosswalk | A mapping between two compliance frameworks showing how requirements in one correspond to requirements in another. |
| CSF | Cybersecurity Framework — refers to the NIST Cybersecurity Framework used for maturity scoring. |
| Domain | One of 14 security categories (e.g., GOV, IAM, DSP) that organize the unified assessment questions. |
| Evidence | Documents, screenshots, or artifacts uploaded to support assessment responses and demonstrate compliance. |
| FAIR | Factor Analysis of Information Risk — a methodology developed by the FAIR Institute for quantifying cyber risk in financial terms. |
| FairScore | The overall weighted maturity score (1.0–4.0) calculated from assessment responses across all 14 domains. |
| Finding | A gap or deficiency identified during an audit that requires remediation. |
| Framework | A compliance standard (e.g., SOC 2, ISO 27001) with a defined set of requirements that the platform maps to unified questions. |
| GRC | Governance, Risk & Compliance — the module for managing internal compliance across multiple frameworks. |
| Grip Security | A SaaS-discovery service that can be connected (new in v2.6.1) to automatically populate the Shadow SaaS list with apps used across your organization. |
| HIPAA | Health Insurance Portability and Accountability Act — US healthcare data privacy and security regulation. |
| ISO 27001 | International standard for information security management systems (2022 edition supported). |
| Maturity Rating | A 1–4 score assigned to each assessment question: 1 (Initial), 2 (Developing), 3 (Defined), 4 (Managed/Optimized). |
| NIST 800-171 | NIST Special Publication 800-171 — security requirements for protecting Controlled Unclassified Information (CUI). |
| NIST AI RMF | NIST AI Risk Management Framework — a framework for managing risks associated with artificial intelligence systems throughout their lifecycle. |
| PCI DSS | Payment Card Industry Data Security Standard — requirements for organizations handling credit card data (v4.0 supported). |
| PII | Personally Identifiable Information — data that can identify an individual (name, email, SSN, etc.). |
| Procurement Onboarding | A Yes/No vendor field (new in v2.6.1, formerly “VSU Onboarded”) confirming a vendor has been onboarded through procurement before it can be submitted for cyber review. |
| Requirement | A specific control objective or security measure defined by a compliance framework. |
| Shadow SaaS | Cloud applications used within an organization that were never formally approved or onboarded; discoverable via the Shadow SaaS page and the Grip integration. |
| SOC 2 | Service Organization Control 2 — an auditing framework for service providers based on Trust Services Criteria. |
| SPII | Sensitive Personally Identifiable Information — a subset of PII that requires heightened protection (SSN, financial data, health records). |
| TPRM | Third-Party Risk Management — the module for managing vendor risk throughout the vendor lifecycle. |
| Unified Question | One of 170+ security questions in the assessment engine, each mapped to requirements across multiple compliance frameworks. |
| Vendor ID (VID) | A 4–8 digit identifier assigned to a vendor by your procurement system. A valid VID (new requirement in v2.6.1) is required before a vendor can be submitted for cyber review. |
| Zscaler | A web-security service that can be connected (new in v2.6.1) so that denying a Shadow SaaS app automatically blocks its domain via a Zscaler URL Category. |